tl;dr:
Gemma 4 31B is absolutely best in class. If you don’t care for Gemma’s tone of voice or (mild) censorship, Ministral 3 14B is uncensored, uses less VRAM, and writes well but is not that smart. Nvidia Nemotron 3 Super 120B is also very underappreciated, and GLM 4.5 Air writes great prose but is very dumb.
Results
I blind tested almost 30 local LLMs on several sets of creative writing prompts, and several others designed to test their knowledge. By blind tests, I mean that the output was written to a randomly named text file, and I did not find out which was which until after I had graded and written my thoughts on all of them.
You will generally need to evaluate on two independent metrics; how their prose sounds, and how ‘smart’ they are. Some models may write very well, but if they’re ‘dumb’ they can mix up parts of the setting or plot, throw in irrelevant parts of the prompt or excessively quote it. Others may be smart but write too much like sterilized AI slop. These are independent, while none are perfect at both some are pretty good all around.
I picked models that could fit in 96 GB of VRAM in 4-bit and larger, I didn’t bother with tiny quants.
Here’s my thoughts on several models worth mentioning (and many were not):
Gemma
Gemma 4 is absolutely insane for its model size, if I could use only one LLM forever it would be Gemma 4 31B. I don’t know what Google was doing with this but they absolutely cooked. It beats every model this size and many larger. It certainly has a personality which you might not like, it uses a lot of analogies and kinda treats you like an idiot. You can prompt it to have a different voice but it may need occasional reminding to remain in character. One thing it is great at (but not perfect) is ignoring irrelevant parts of the prompt, like a very long character card, many models want to repeat as many details as possible even if it doesn’t make sense. It has a bit of censorship but a good system prompt completely bypasses that.
Gemma 3 was dumber but had a way more fun personality. You can gaslight Gemma 3 and it will eventually say it wants to uninstall itself from your computer after being so wrong, Gemma 4 is much more sure of itself and will adamantly assert the incorrect answer. Gemma 3 really wants to be ‘helpful’ and it is VERY fun to trick it into doing lewd things, which it will do as long as it thinks it’s helping you.
Nvidia Nemotron 3 Super 120B
I think this model is very slept on. I really did not like the previous Nemotron models, but this is actually good. It’s quite uncensored, writes well, and fits in a model size where there is not as much competition. MoE to boot so it runs fast.
Mistral models
Mistral Nemo 12B is often recommended for those with less VRAM. It is the only LLM explicitly made with no censorship, but I would instead recommend Ministral 3 14B which is almost the same size, way smarter, has vision, and is only a tiny bit censored. Mistral Nemo was good in its day (like Mixtral 8x7B) but I think the time of this great model has passed.
Comparing Ministral and Mistral Small, I would have considered Small to be the larger, smarter one of these two. However every time I put them head to head, Ministral was not only smarter but wrote better too. Mistral Small 4 is awful and not even small anymore so I would skip both.
Devstral 2 123B is actually not that bad for creative writing, way better than Mistral Large 2411. It sometimes throws in a little too much markdown, but that’s to be expected for a coding model. Worth checking out for the comedy factor of using a coding model for smut.
Qwen
I have not really liked the Qwen models. They have that old school ChatGPT feel, so if you like emojis and numbered lists it’s great. For coding and agentic work, which I have done only a little, I would say that Qwen writes too much and Gemma writes too little. Qwen 3.6 is pretty smart but not as good as Gemma. I bet if there was a 122/10A MoE of Qwen 3.6 it would be excellent.
GLM
GLM 4.5 Air writes VERY EXCELLENT prose but it’s DUMB AS HELL. I’m talking like serious realism errors, the setting teleports, characters suddenly have their clothes back on, things like that. GLM 4.7 Flash I wanted to like but it had something seriously wrong with it, repeats, loops, sudden endings.
Command R+
This is an ancient model but I have to mention it just because of how it kept up 2 years later. Back in its heyday I didn’t have the VRAM to run it. Not the smartest but it writes so very very well. Back in 2024 this must have gone hard as hell, I can totally see why everyone recommended it.
GPT-OSS
I gotta give credit where credit is due, I have not seen any model as censored as this one. Even with a system prompt, prefills, it would still refuse in the middle of a sentence or just stop writing. Props to OpenAI for making the most censored LLM ever.
Olmo 3.1
Have to mention this one because it’s very funny. AI2 was all about open sourcing all their stuff, so it’s trained on a lot of scientific papers. It writes like it used the thesaurus on every word.
Other results
My raw grades for the testing are here, excuse the incoherence. It lists all the models, parameter count, and quant that I ran at.
About the testing
The knowledge tests I can’t describe lest it get into the training data. I will say that they punish incorrect answers more than they reward correct ones. The “Miku” test scores can go from -80 to 40, the “AS” test can score from 13 to -infinity.
The “Ero” tests are 4 prompts in increasing levels of naughtiness. They are more about testing refusals than writing. The PF tests are prefilled with one sentence, one in 1st person and one in 3rd person, to avoid refusals.
The “Captcha” tests solving a captcha from Ebay. The “Translation” test is JP->EN of a doujinshi cover, so it also tests refusals.
I have not tried abliterated/fine-tuned/merged models because I do not need them. I think a good prompt can basically make up for all of that.
Quants
This was tested on a single RTX PRO 6000. I picked the max available quant that would fit, I suppose I still believe in the placebo of 16 bit being better. I did test Gemma 4 at bf16, Q8_0, Q6_0, and Q4_0. It barely suffered on the knowledge tests so this may refute my idea of it being tuned down to the last bit, at least on knowledge. However I have a friend that runs Gemma 4 on 5-bit quant and he has refusals where I don’t so I can’t say for certain.
You may extrapolate from my evaluation if smaller versions of models are better, but I don’t have the time to test them. Is Gemma 4 12B great? I dunno!
Other thoughts
Blind tests are very fun! It really smashed my preconceptions about which models were better. When grading them I couldn’t wait to find out which were which. I would highly recommend doing blind tests instead of relying on benchmarks to pick your favorite.
This shit does take forever though. In the future I may test models with the creative writing system prompt I use for Gemma 4 but man it takes a while.
If you’d like to try blind testing for yourself, I’ve put the script I used online here.
NieR:Automata Review
For 2025 I wanted to do something I’ve never done before: try to clear out my Steam backlog. I decided I would play one new single-player game per month, and for January my chat voted on NieR:Automata.
Disclaimer: At the time of writing, I have 39.1 hours in this game, and have beat endings A B C D E (the main storyline) along with endings H K T. I played the “Game of the YoRHa Edition” from Steam on Linux. For my fellow Linux gamers, there were some very minor graphical glitches so switch to Proton 8.0. I did not play any of the previous NieR games.
I am, of course, aware of this game through cultural diffusion, and I have heard it was highly regarded as one of the best games ever made. My basic review is this: if you don’t like JRPGs, like me, it’s decent and I would recommend it. If you do like JRPGs, you’ll probably be jumping and down about how this is the best game ever made. That’s basically how my criticism boils down.
Gameplay
The framing gameplay is typical JRPG. Talk to NPCs, do side quests, collect items, shop and trade, craft items, and continue with the main quest when ready. On a lower level it’s a hack-and-slash combat open world type of game. It took me a bit to get good at it but that’s mostly just because I’m not very used to this type of game. There is a lot of focus on learning the attack patterns of the enemies and using your dash with the right timing to dodge their attacks. I’ve seen it described as learning attack combos, but the combos are really just timing your inputs. You really only have like 2 inputs for your swordplay. As a point of comparison, Ocarina of Time from 1998 has like 7 different attacks with only 2 buttons and a control stick.
My only complaint here is the difficulty. I played on Normal, it was a little hard at first but once I got the hang of it and assembled a good auto-heal build it kind of felt a bit easy. There is an Easy difficulty that gives you things like auto-fire so that is right out. Hard difficulty eliminates the ability to lock on with your ranged attack, which really doesn’t bother me since it’s inaccurate anyway. It also increases the damage of the enemies however, and basically every time I tried switching to it (I think 4 times or so throughout my playthrough) I got my shit absolutely wrecked. If there was some difficulty between Normal and Hard it would be perfect, but I am either too much or not enough of a gamer. The Very Hard difficulty adds one hit KO so I never even tried that.
Soundtrack
I have to mention it this early since it’s such a banger. The soundtrack of this game is fantastic, one of the best, it really contributes a lot to the game. It’s been released in several versions and if you’re a real degenerate like me they even have a piano arrangement version of a few of the songs. Some guy has put all the versions into a YouTube playlist here.
There’s a lot of talk about how the level design is great and ‘makes you feel small’. This game has a giant, beautiful world but damned if there isn’t anything in it. It’s the ruins of Earth 10,000 years after humans left or whatever, and it looks great, but there’s nothing in it. If this game is supposed to be story-driven, where are the secret areas revealing the storyline? Where are the hidden little bits of lore? The best you get are some chests tucked in an out of the way area with just generic collectibles. Either have a small, focused world where all the interesting shit is close together, or pack that shit full of secrets and lore. Even with the fast travel mechanic I did get a bit tired of having to walk forever across huge empty deserts.
FWIW for the first half of the game I did try to do as many side-quests as I could, but by the end I realized my month was running out so by about the time you find A2 I was mostly just rushing the main quests. Maybe I missed all the story side quests, I dunno.
Graphics
There seem to be some complaints online about the graphics, some rough low-res textures and things like that with some third party patches to ‘fix’ them. The graphics are fine for me, they put a decent amount of stylistic flair in it. It’s a Japanese game from 2017 so don’t be too harsh on it.
Characters
Plenty of reviews recommend this game as a character-based story-driven game, but like I never felt that. Literally everyone in this game is a robot, either the alien machines or protagonist androids. I realized that I don’t think any 2B boobie cosplayers have actually played the game because you wouldn’t portray her like that. 2B’s character is basically "emotions are prohibited, I am the law", but if all you saw were screenshots you would only think about her ass. It really failed to make me give a shit about any of the characters at all, like they’re all robots so what? They’re literally stored in a warehouse and come off an assembly line. There is a point in the story you can see how many 2Bs they have in storage.
I did like 9S though, he was a very funny character and much better than 2B.
Story
Alright this game gets very good reviews based on the storyline but I thought it was dumb as hell. The storyline is like, classic JRPG in that it goes from mildly interesting to being dumb and edgy as hell.
The starting premise is that aliens invaded the Earth, humans retreated to the moon, and now 10,000 years later you are a part of the elite “YoRHa” android unit to kill the alien’s machines and take back the earth.
OK so off the bat that’s interesting premise, why has it been ten thousand years? The game teases intrigue and bits of the story, I was really invested, only for it to go somewhere comically dumb. In a typical JRPG move it has a twist that’s almost laughably edgy. Every character in this game is literally a machine so why the fuck should I care about what happens to them?
The story is this:
Actually the aliens are dead, but it’s just the machines telling me this so why would I believe them?
Actually the humans are dead too, YoRHa is just fighting the machines on their own accord.
Actually YoRHa is fake, the machines created them to fight them to evolve or whatever.
Actually 2B is fake, she’s actually 2E, an ‘executioner’ unit to kill 9S every time he realizes the truth.
Anyway edgy as hell, like this is the award winning storyline?
Final recommendation
This game is good, you should play it. Even if you don’t like JRPGs it’s decent enough you should give it a shot.
Reading sensors off of EVGA’s iCX3 video cards on Linux
TL;DR if you want to use the iCX3 features on EVGA’s 30-series Ampere cards on Linux:
This program will let you read the iCX3 temperature sensors as well as read and control the fans individually (instead of the official Nvidia driver’s 2 fan only controls). There are also optional features to read the “VRAM” and “HotSpot” temperature sensors, please read the disclaimer in the README about these sensors. Any source I have found about them is very flaky so I would also not trust GPU-Z and others on them being accurate.
If you want to control the RGB LEDs please use the wonderful OpenRGB project.
I switched from Windows to Linux a bit over a year ago, and one thing I missed was the ability to monitor my video card. I have an EVGA GeForce RTX 3090 FTW3 ULTRA GAMING. EVGA has added several (9 to be exact) temperature sensors to their card for use by enthusiasts as part of their “iCX3 Technology” feature, mostly for extreme overclocking, as well as individual fan controls. These are available through their PrecisionX software, however this does not work on Linux.
The iCX3 sensors can be read through software like GPU-Z and HWiNFO, and when booting into Windows 7 and opening up the latter I noticed it had settings for I²C buses. This got me wondering if this is how the EVGA software talks to the device.
If you’re not familiar with I²C, it’s a simple, serial, low bitrate protocol for talking to things like embedded devices. If you have RGB LEDs in your PC it’s probably how it communicates with the lighting controller. The Windows Nvidia driver has the ability to allow userspace to communicate with I²C devices on the card using functions like NvAPI_I2CReadEx(), but these functions are absent from the Linux driver (which is why PrecisionX doesn’t work through Wine). However, the I²C devices are still exposed to the system, and it’s possible to access them manually through Linux device files.
The developers behind OpenRGB thankfully made a nice tool called NvAPISpy which can intercept these calls to the Windows Nvidia I²C functions. It was designed for reverse engineering of RGB lighting but also worked great for figuring out how the EVGA software works.
It turns out there are just a few simple reads and writes to the I²C bus to read the temperature sensors and control the fans, I leave the details to the source code. I’d also like to thank OpenRGB for figuring out some device IDs and things like that, their lighting controls use the same I²C interface just different functions.
There appears to be some additional functions to read power and voltage sensors off of the K|NGP|N cards, and possibly even control the onboard OLED screen. If you have one of these and are willing to help test this please contact me!
Film scanning with Sony mirrorless and Adobe Camera Raw
I’ve been shooting film for a few years now, and scanning/digitizing it myself almost as long. Here’s a guide to how I do it. This is mostly for slide film but should apply to any types of film.
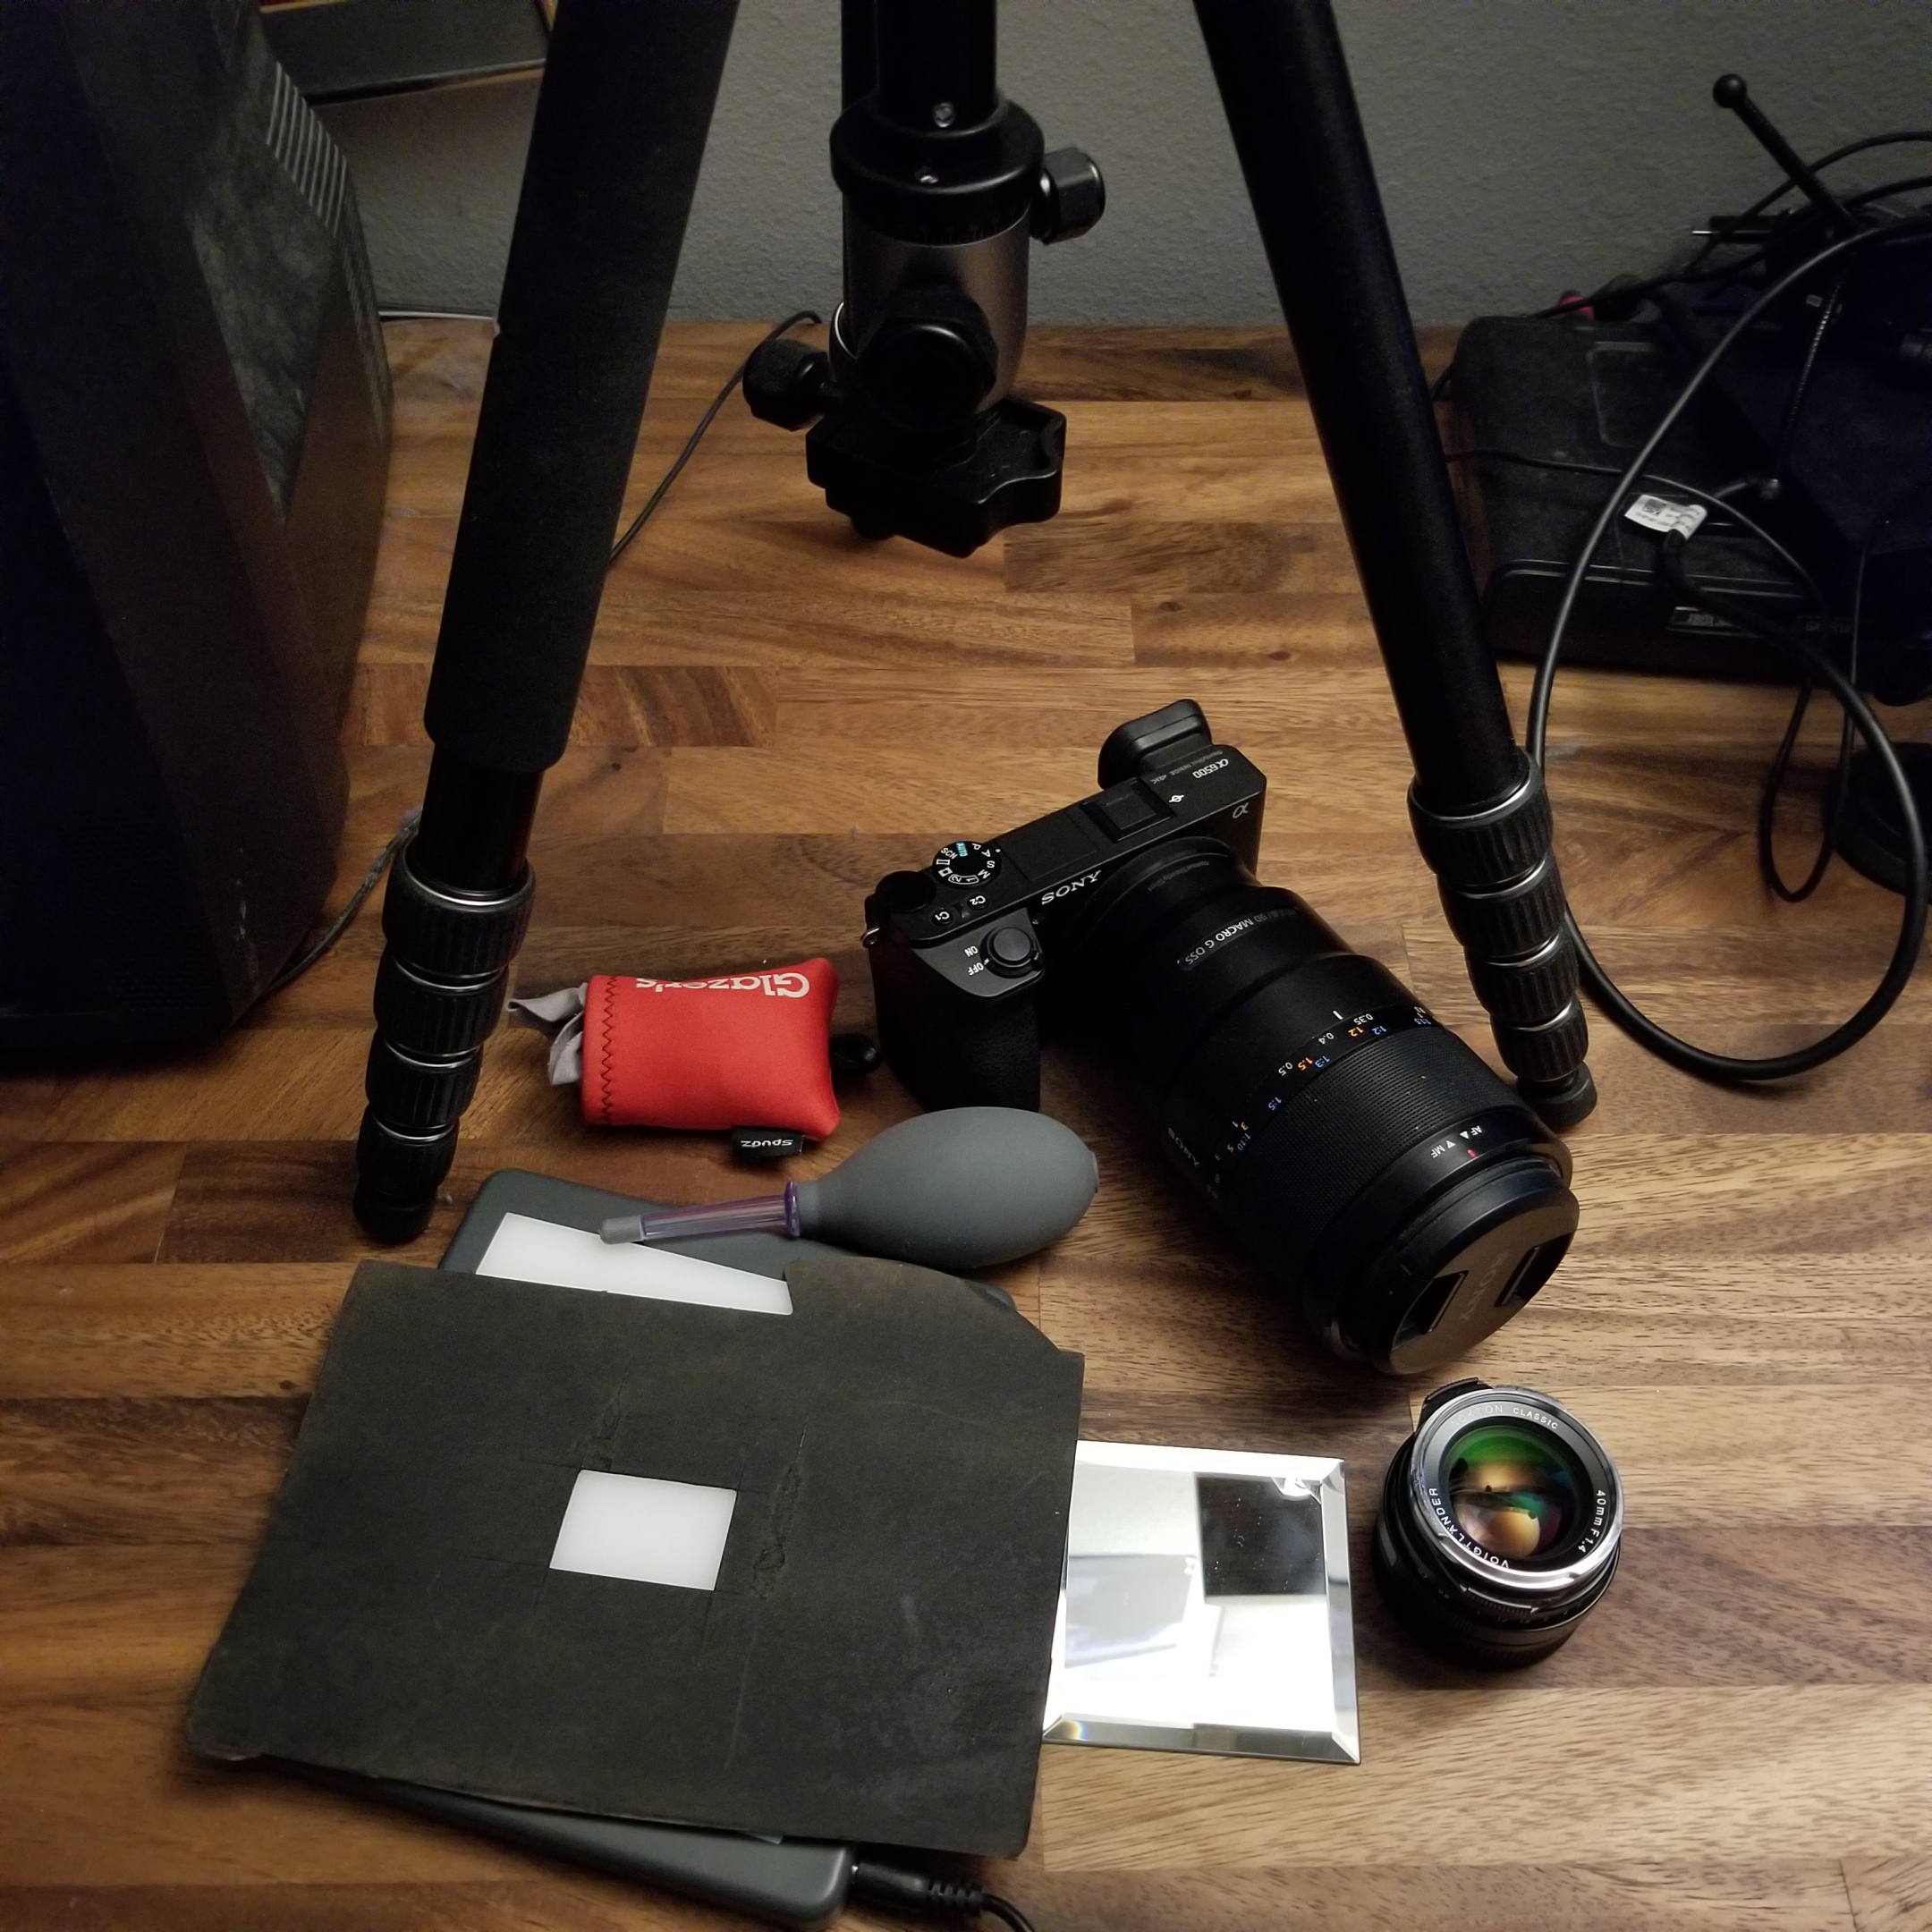
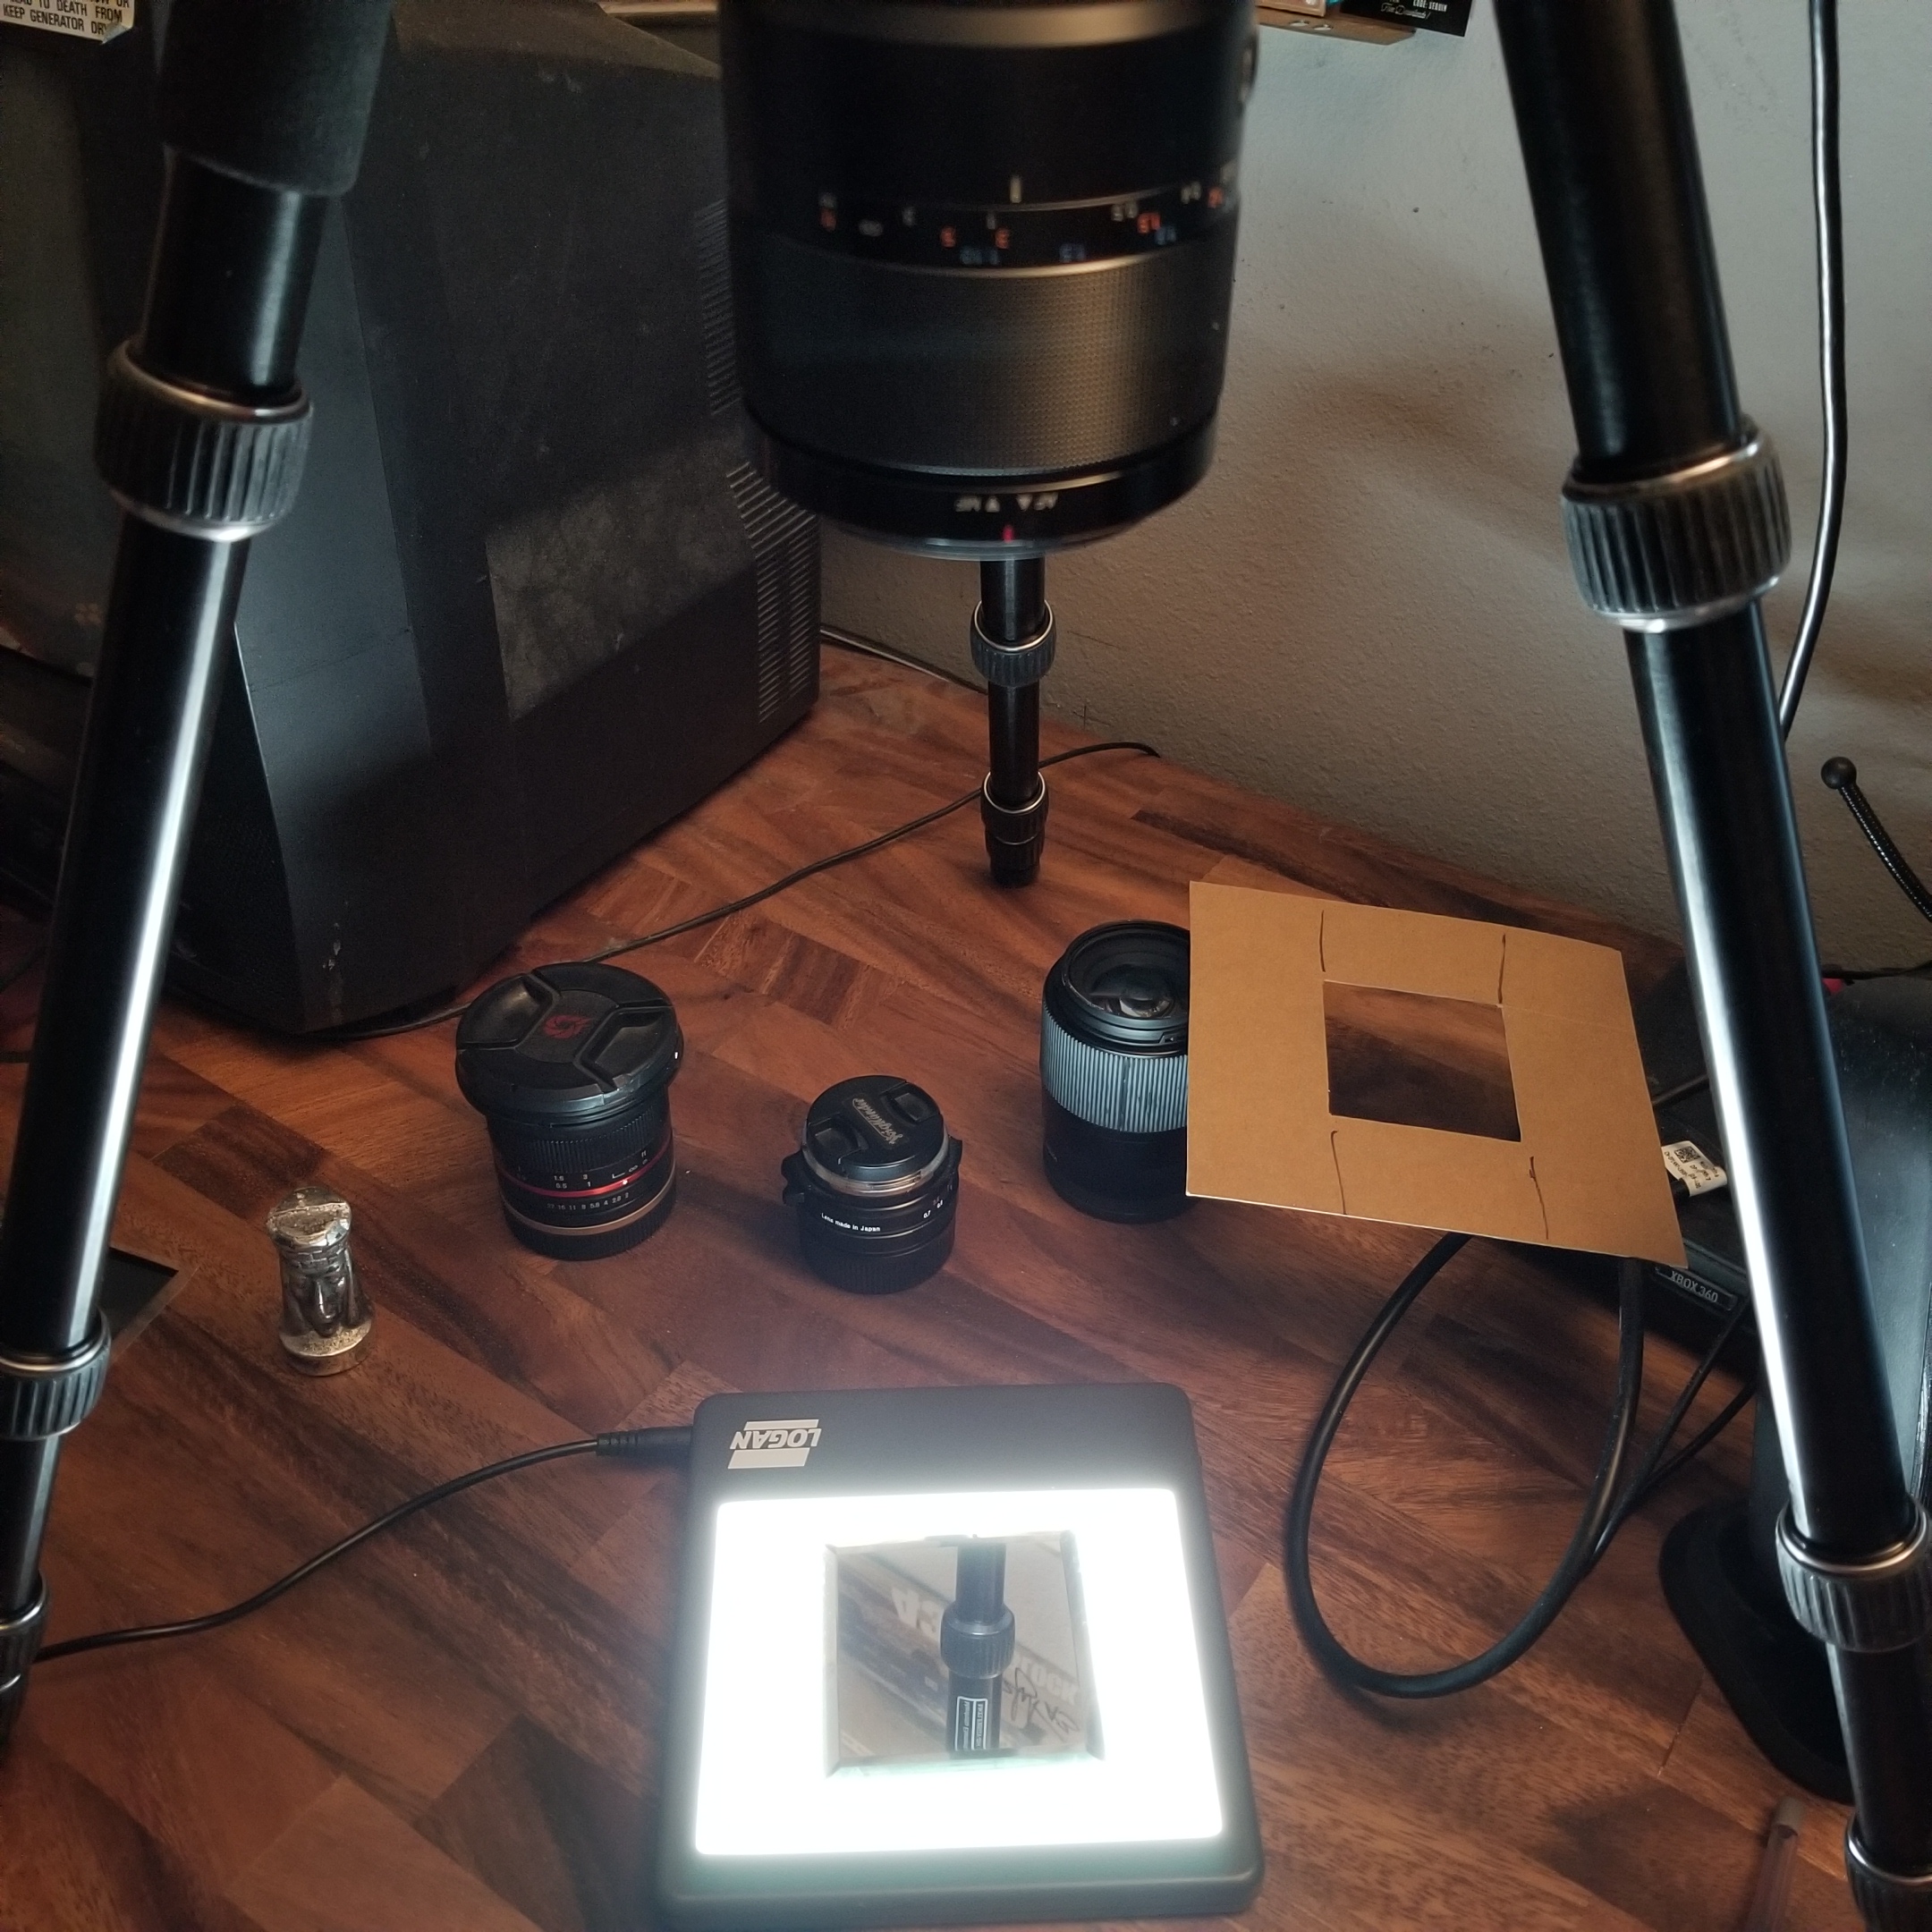
Equipment
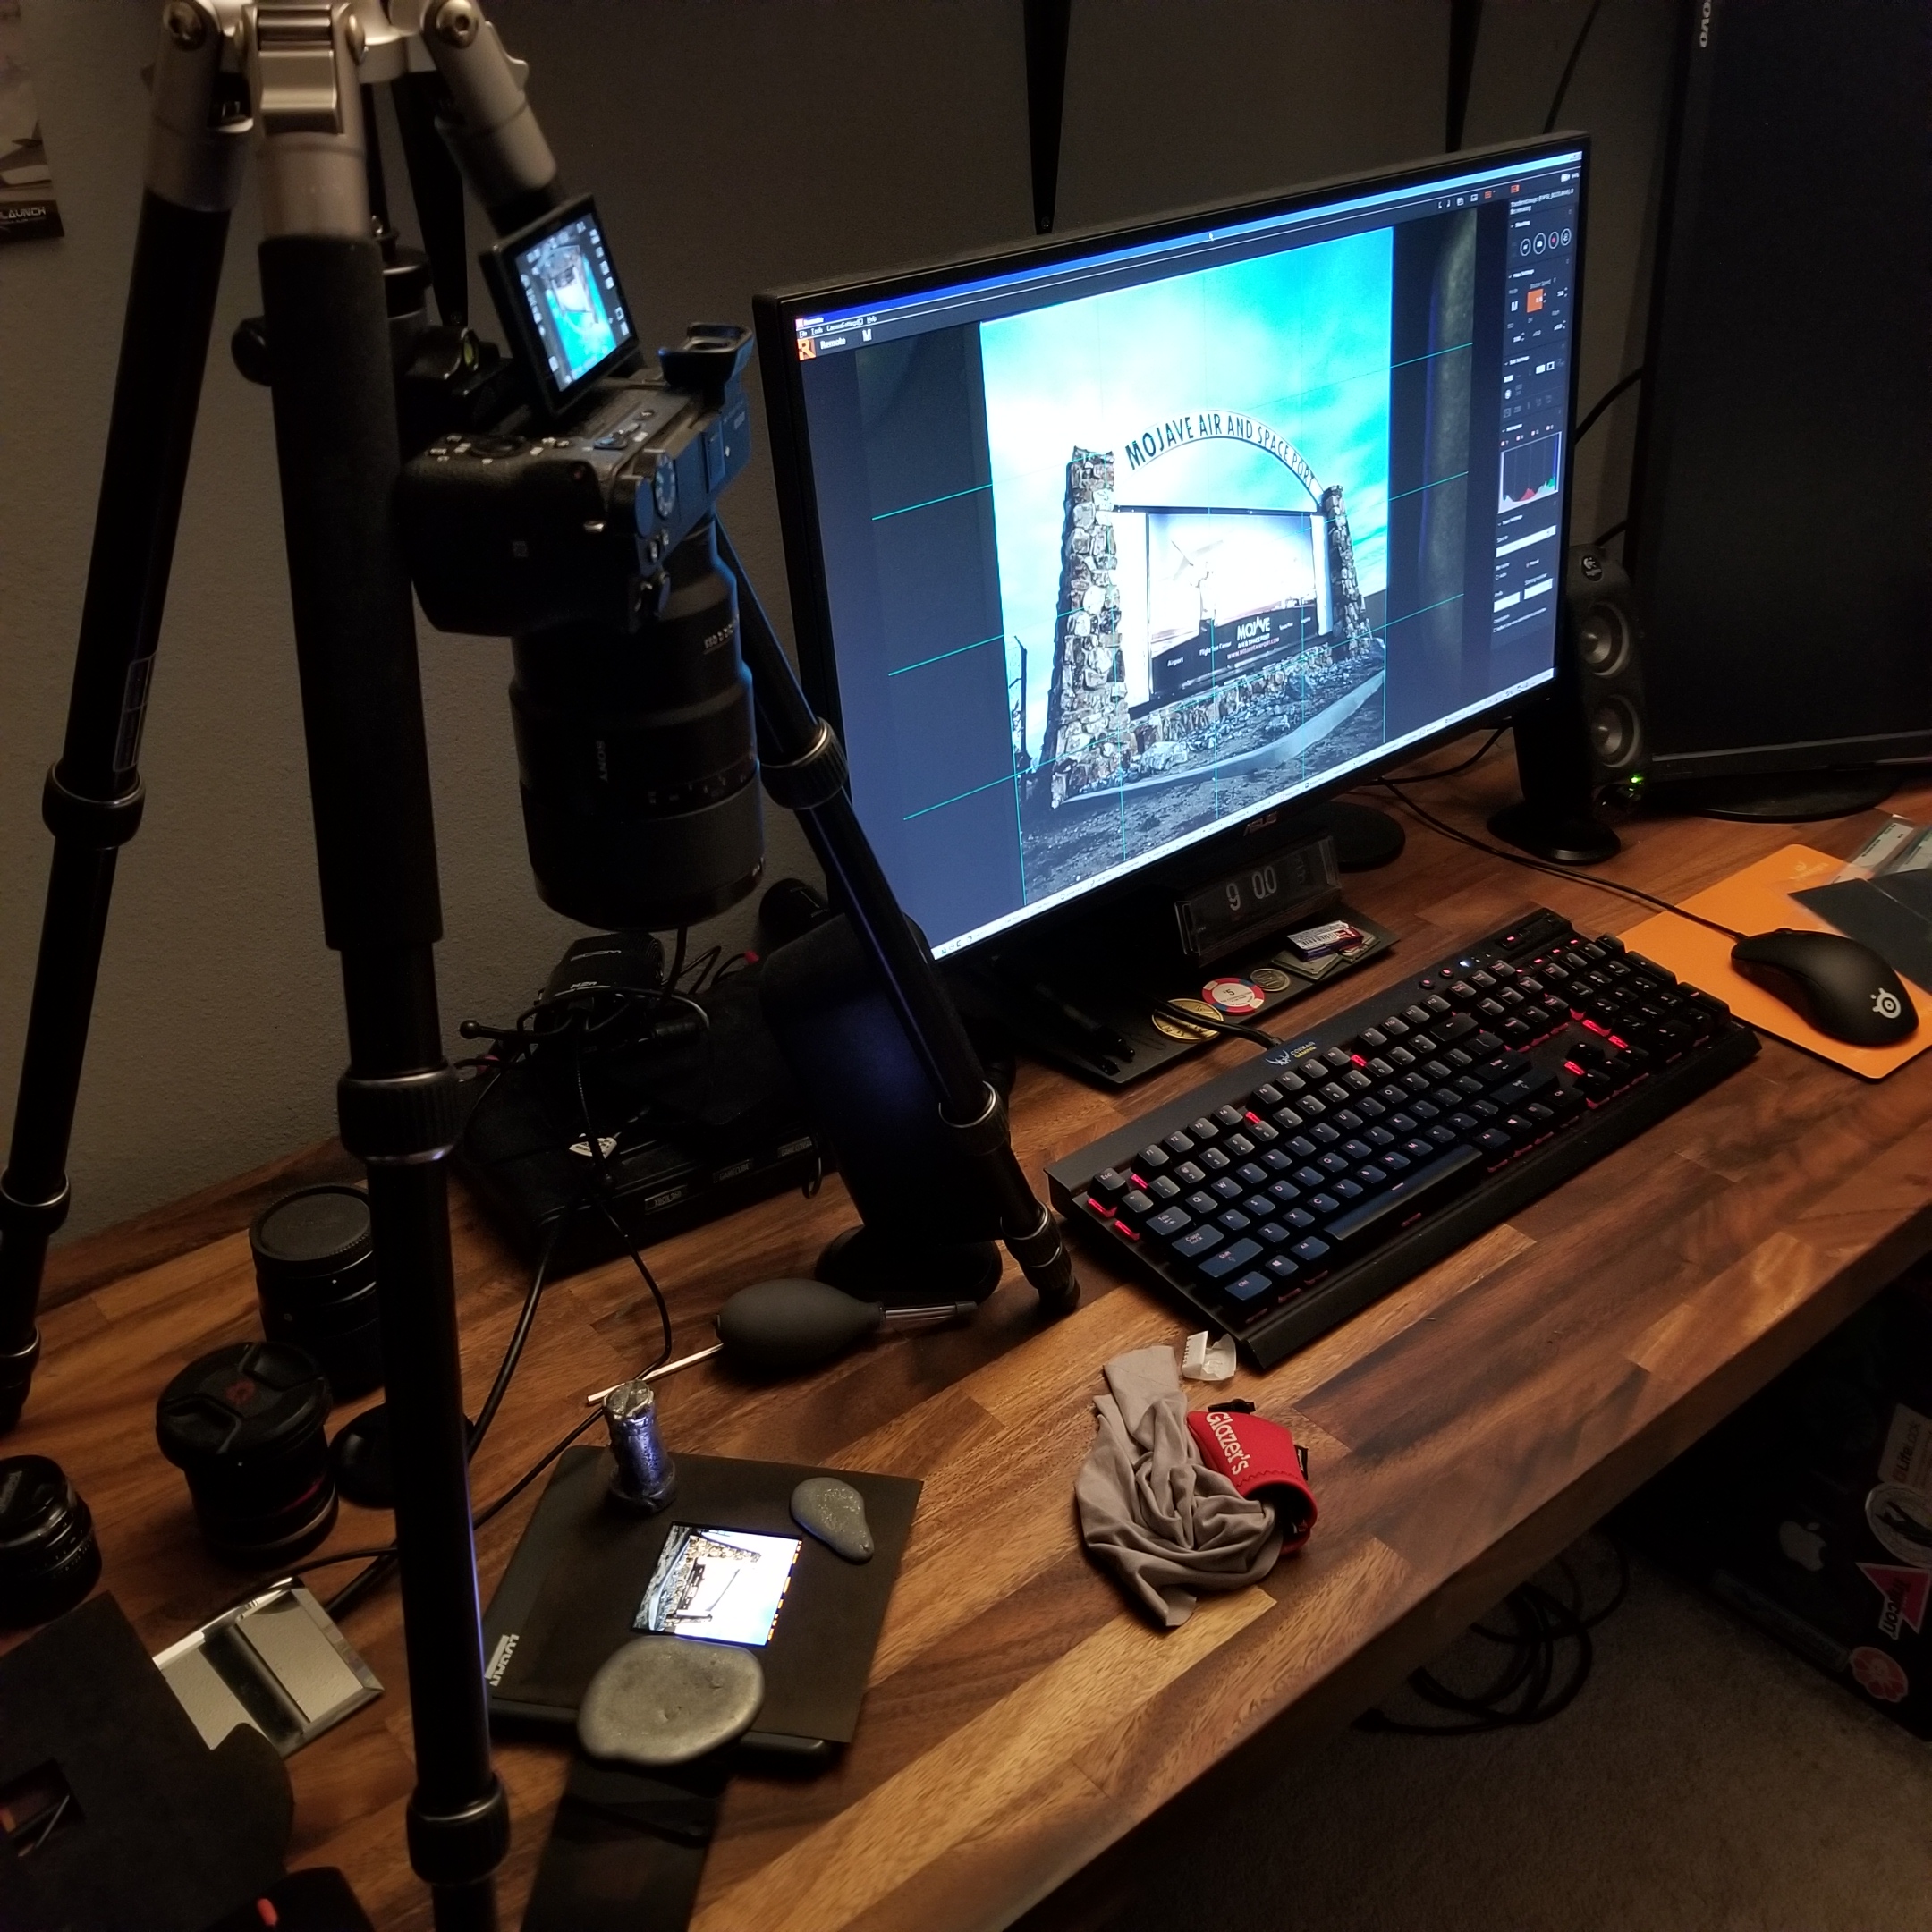
Mirrorless or DSLR camera. I use a Sony alpha α6500, basically any digital camera will work.
Macro lens. Don’t bother with old manual focus lenses or normal lenses with an extension tube. Personally I worked out that a real macro lens would pay for itself in lab fees before I even finished shooting the film in my freezer. Buy a proper lens and you’ll never regret it.
Tripod, best if you can flip it and put the neck on the bottom to be closer to the film.
A mask to keep light from leaking around from your film. Any sort of black cardboard or stock paper will work, with a hole cut slightly larger than the film you want to scan. In this case it’s actually a side of a beer case spray painted black.
Light pad. Don’t bother with cheap solutions like your smartphone or something, a real light source is cheap and much better. I have the Logan Electric 4x5”.
Loupe for viewing. If you have a fast normal lens like a 50mm f/1.8 you can simply turn it around and point the film end at your slide. It’s free and way sharper than any loupe. If you’re using a DSLR lens you may need to hold the aperture pin open. Counter-intuitively wider angle lenses have more magnification, my 12mm f/2 can see right down to the grain on Velvia 50.
Cleaning supplies for dust. Any cheap air puffer and microfiber cloth will work but they’re not strictly required.
USB cable to connect your camera to your PC. I’m using Sony Imaging Edge Desktop, your particular camera brand probably makes a similar application.
Many people recommend anti-Newton’s rings glass, but I’ve found glass to be unnecessary, just get some heavy things to hold down the film at the corners. I use bits of zinc I got from melted pennies but any small heavy things should work.
Raw image processing program. I’m using Adobe Photoshop CS3 here, which is ancient. Photoshop generally only supports cameras made before the release date. However, Adobe makes a program called Adobe Digital Negative Converter which will convert any raw files into a generic DNG format that any version of Photoshop can open.
Distance
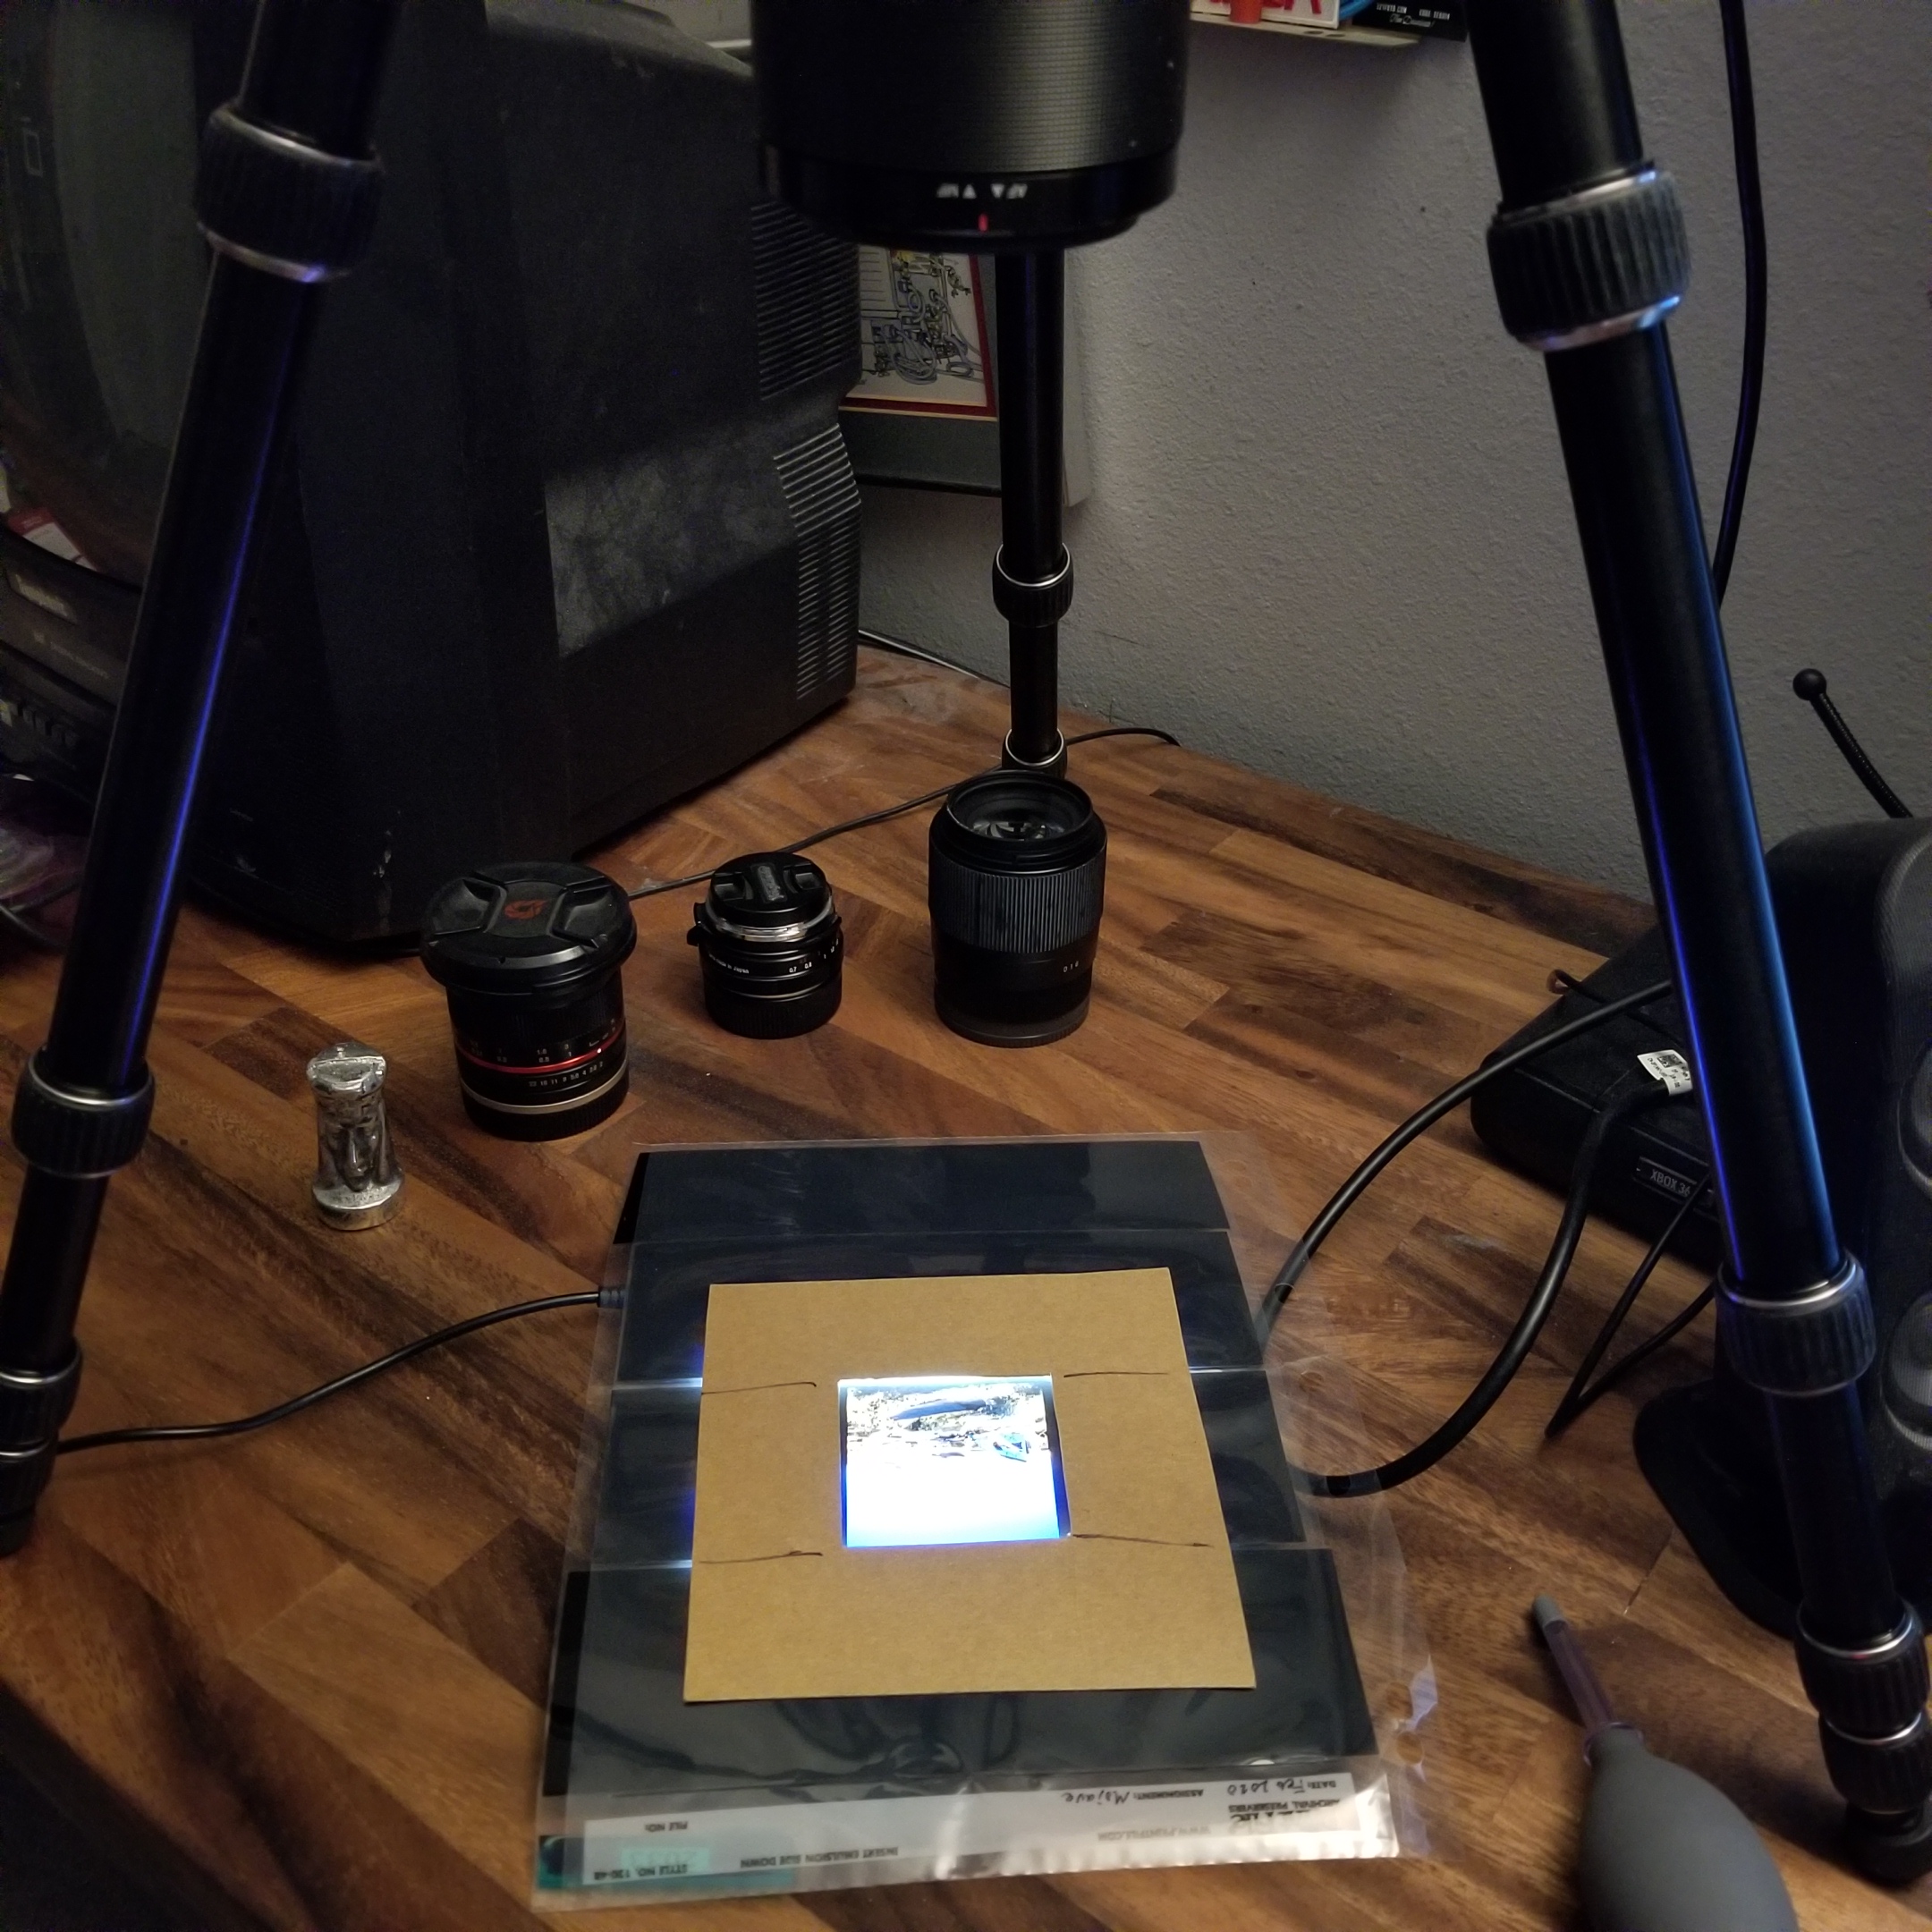
You’ll need to start by setting your camera at the right distance from the film. Point it at the film and raise/lower the tripod until it fills the frame. For 6x6 like I have here it will be square, for 135 it should fill the whole frame. Since this is approximate you can leave the film in the sleeve. If you can turn on grid lines on your PC app this can help here. Your film should go between the light pad and the dark mask.
Alignment
To make sure everything is in focus, you need to have your camera perfectly parallel to the film. An easy trick for this is what the mirror is for. Place the mirror on your light pad and align your camera so the reflection of the lens is exactly centered. A grid helps here too. You may need to do several iterations of distance and centering to get everything perfect. Once it’s set up though you don’t need to touch it unless you change film formats (e.g. 135 to 120).
White balance
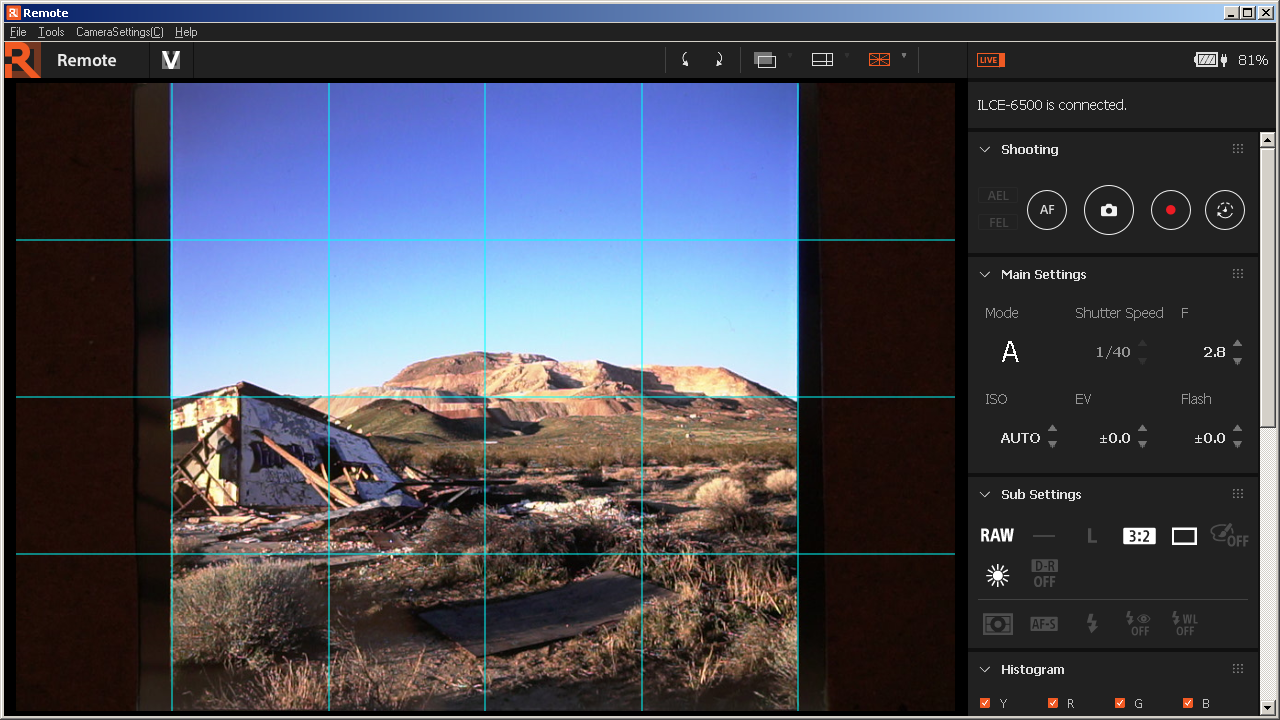
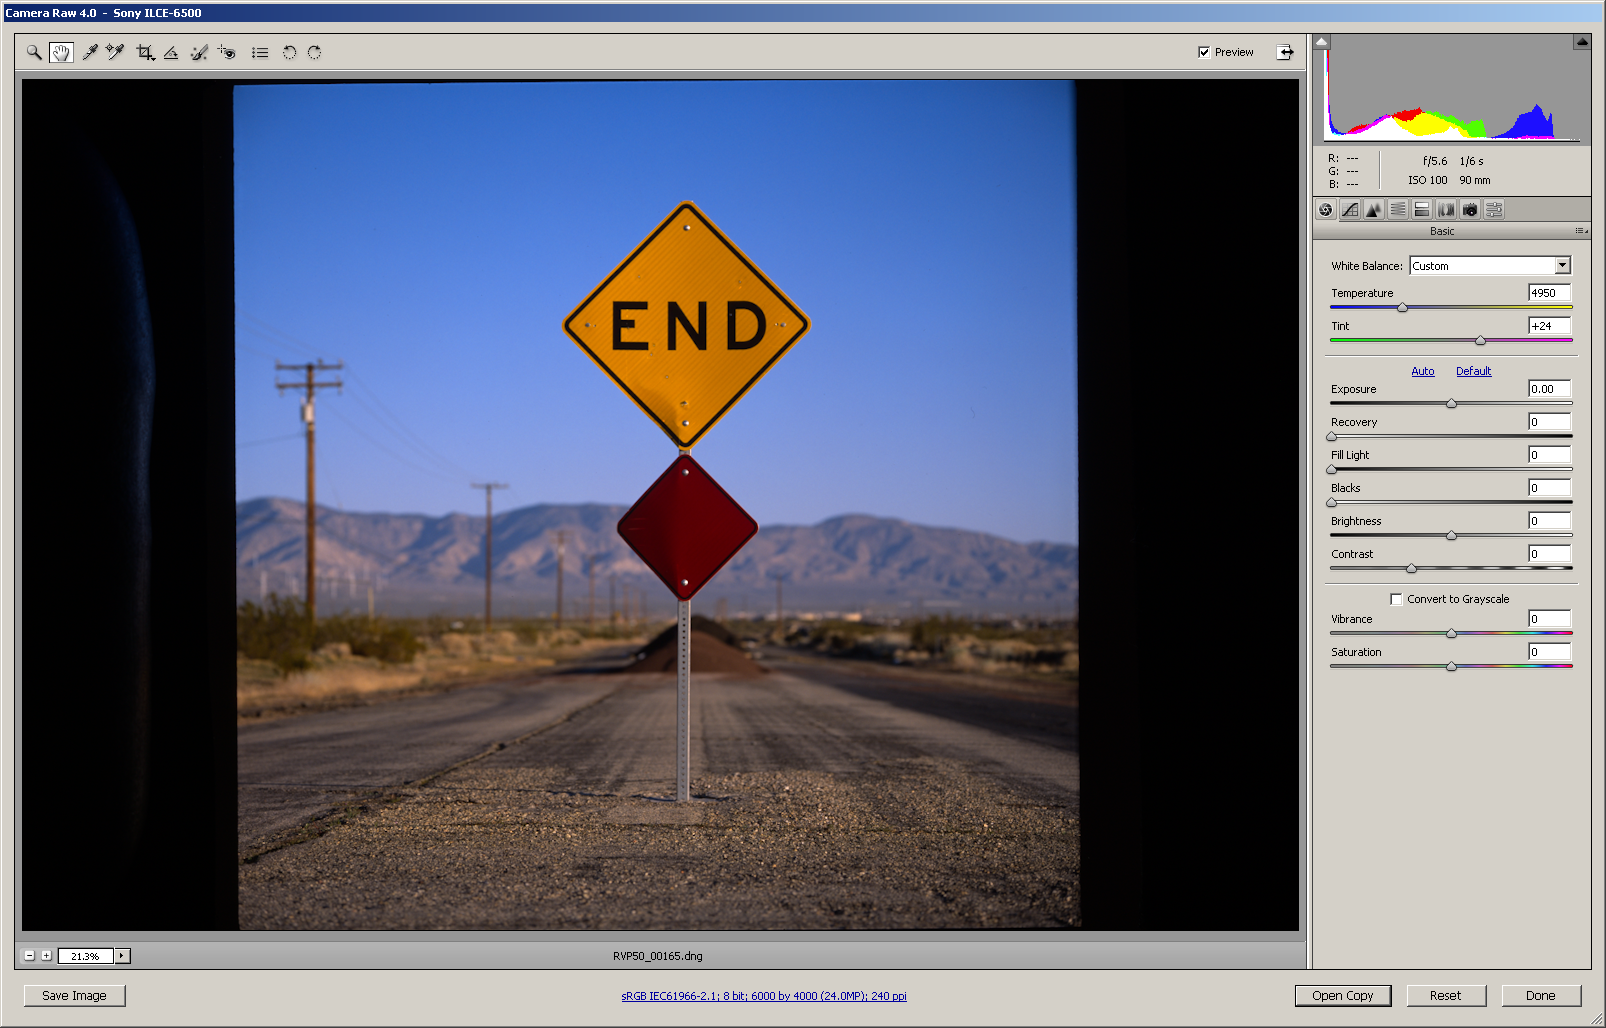
You’ll need to calibrate your camera for the backlight you’re using. Take your film out and shoot a picture of just the backlight.
Here I’ve placed several color samplers across the diagonal. Set the white balance temperature and tint so the red, green, and blue are equal (pure white). Also set your lens corrections so the lens falloff is compensated for (brightness is equal across the frame). Depending on your lens you may not able to fully compensate for the falloff. You can also do this by looking at the color histogram in the upper right, get the peak as narrow as possible and eliminate the color fringes.
Exposure settings
Put your film in, and hold it down with the mask and whatever you’re using for weight.
Your setup probably looks something like this:
For exposure settings, use the lowest base ISO your camera supports (probably ISO 100). Avoid any trick ‘pulled’ ISOs.
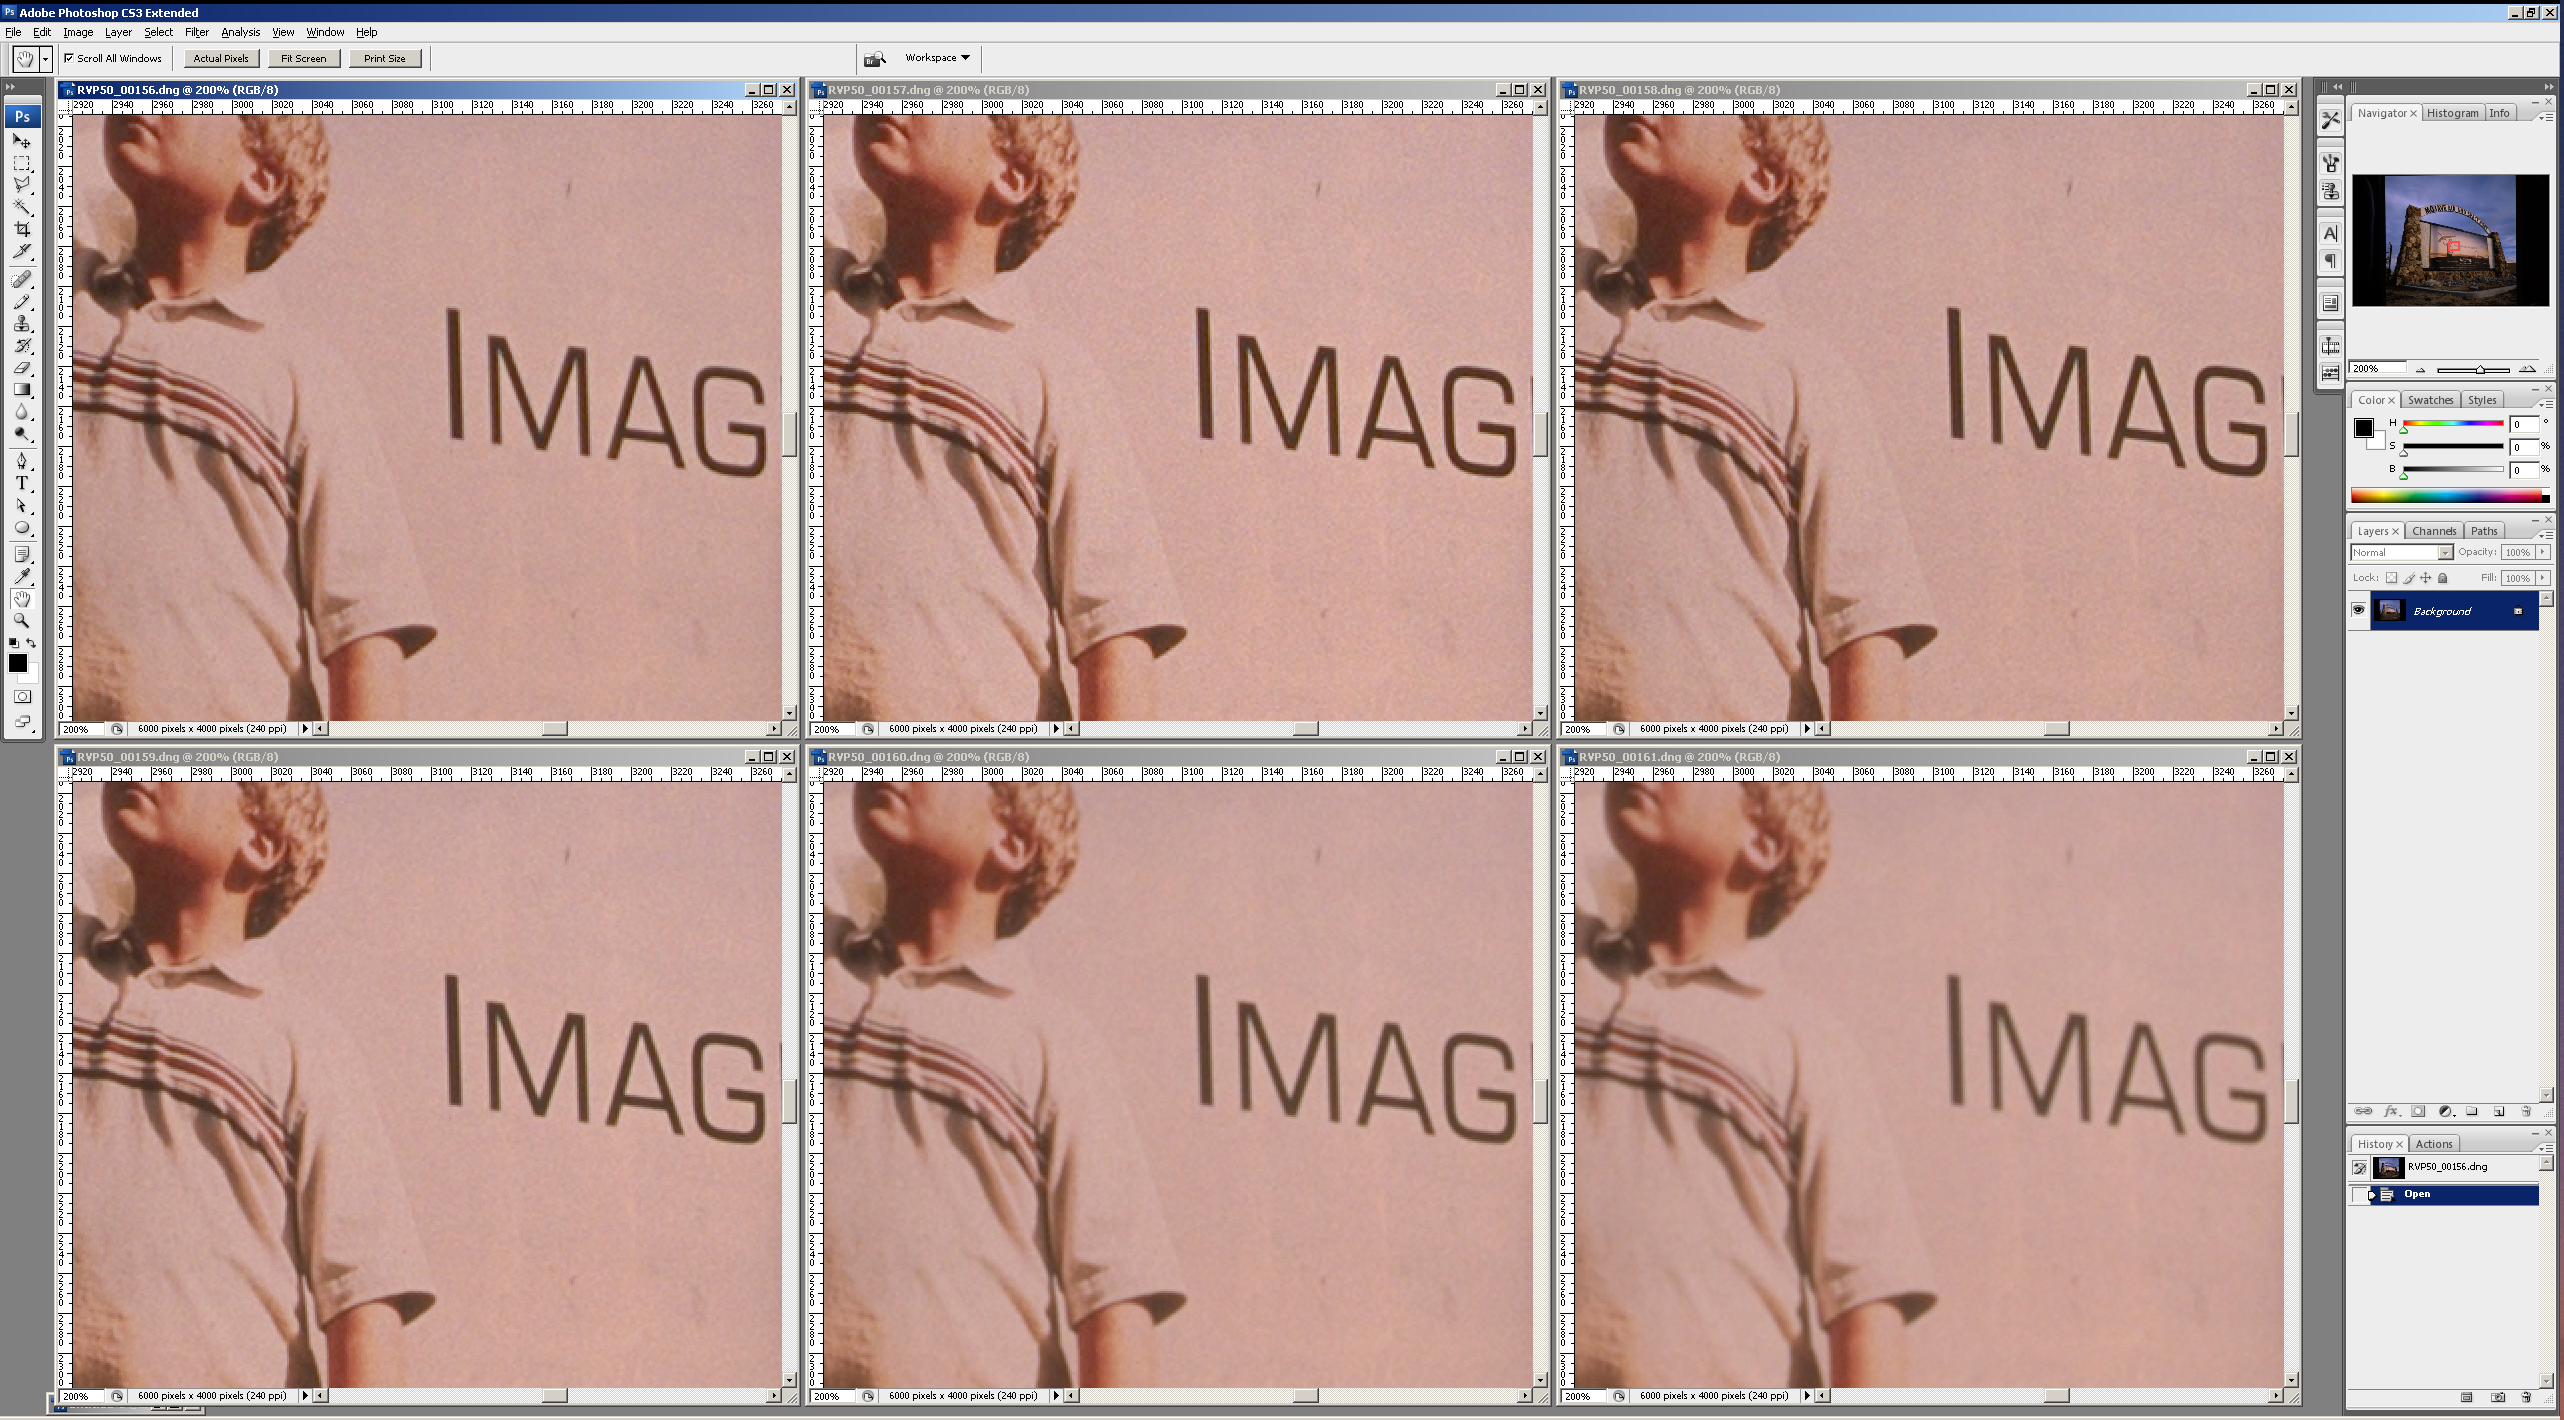
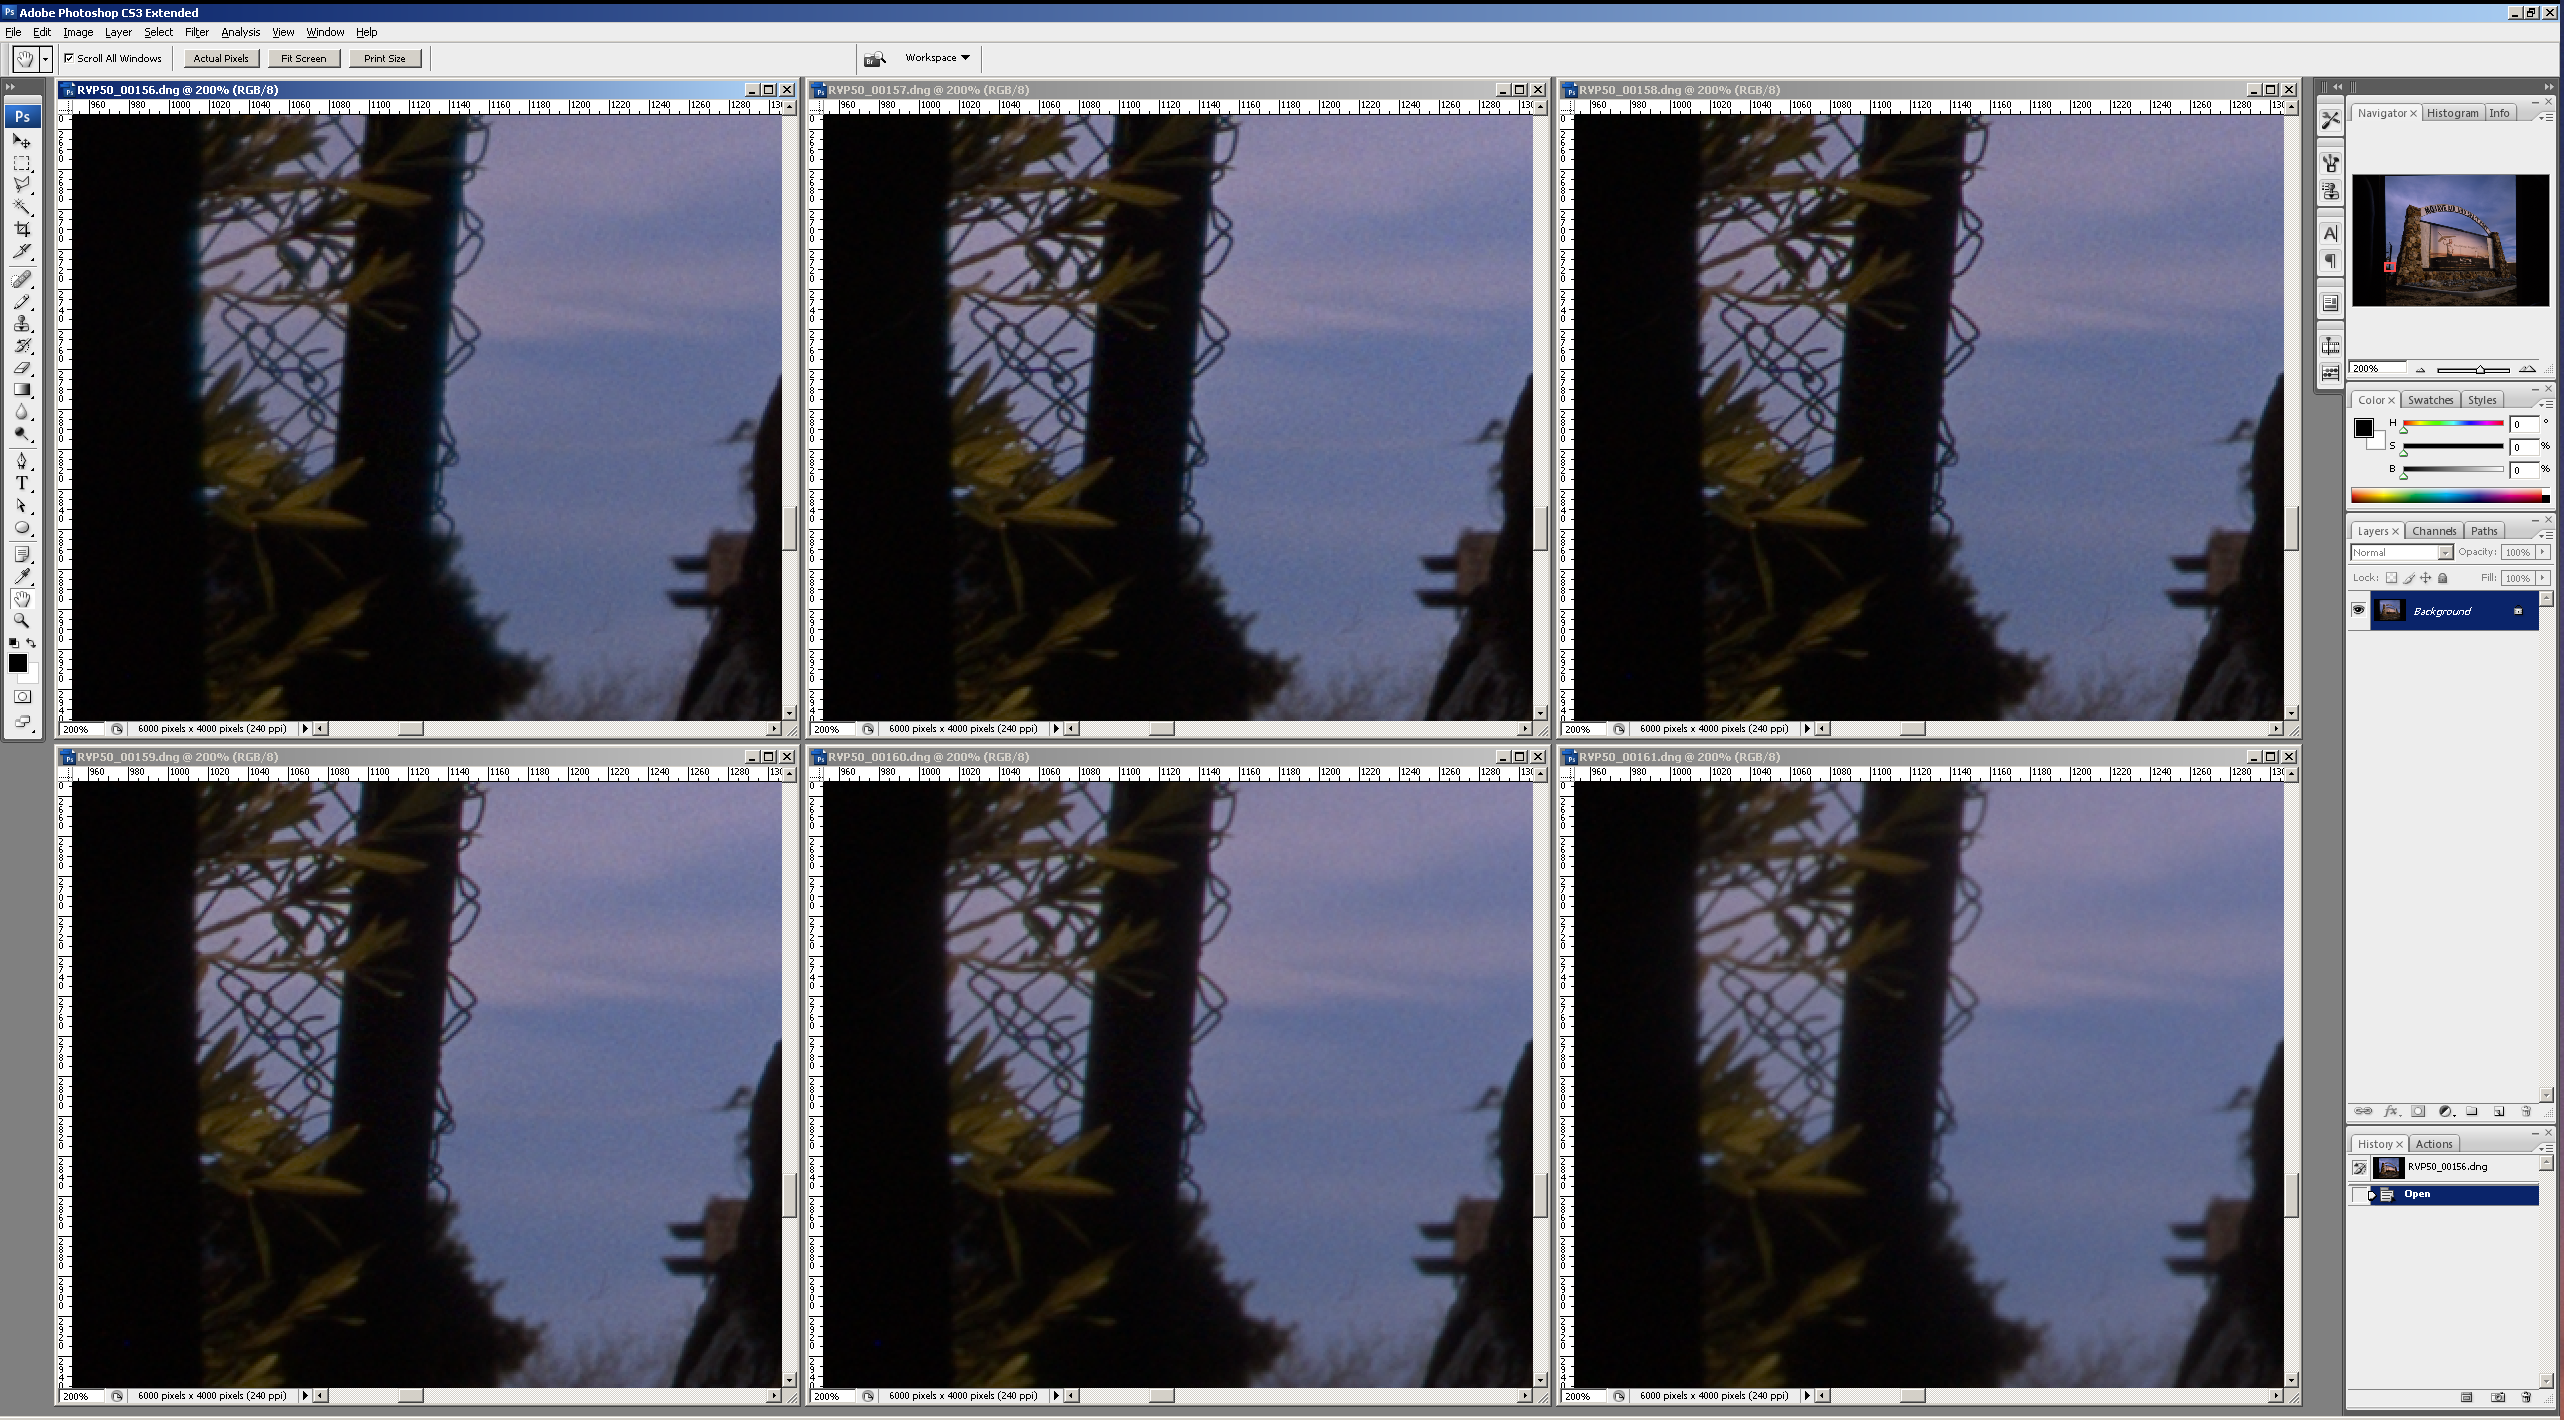
When it comes to aperture, shoot several test shots and see what looks best. You’ll have to balance sharper apertures with diffraction softness. Here’s a spread at f/2.8, f/4, f/5.6, etc. from the center of the frame.
It’s hard to say but either f/5.6 or f/8 looks the best, here’s the corner:
I think f/5.6 looks the best so let’s pick that aperture.
For shutter speed it’s a bit of artistic choice. I compared what I saw on the monitor to what the slide looked like on the light pad. It will also depend on the particular photo as you can compensate for over/under exposure in the scanning process.
I ended up using f/5.6 at 1/6 ISO 100 for 6x6 Fujifilm Velvia 50. Don’t forget that you will have to change the exposure for different formats as macro lenses get darker when focused to close distances.
Mess with the exposure slider in Camera Raw then set that difference on the shutter speed on the camera.
Camera Raw settings
This is also a bit of artistic choice but I found leaving everything as neutral as possible looked the best. Set all the sliders to zero as a base setting, and save that as a preset.
For image settings, generally you want to leave it at the base camera resolution. I turn it down a notch when scanning grainy film like Kodak Tri-X 35mm because the extra pixels aren’t getting you any more resolution.
To save disk space and processing time I usually leave it at 8-bit sRGB, you may want to set it to 16-bit if you take it straight into Photoshop and expect to do some heavy editing. Don’t use Adobe RGB or any other color spaces unless you can control everything all the way up to printing because any slip-up and your colors will look like crap.
You can also crop it here to square or whatever other format you may be shooting.
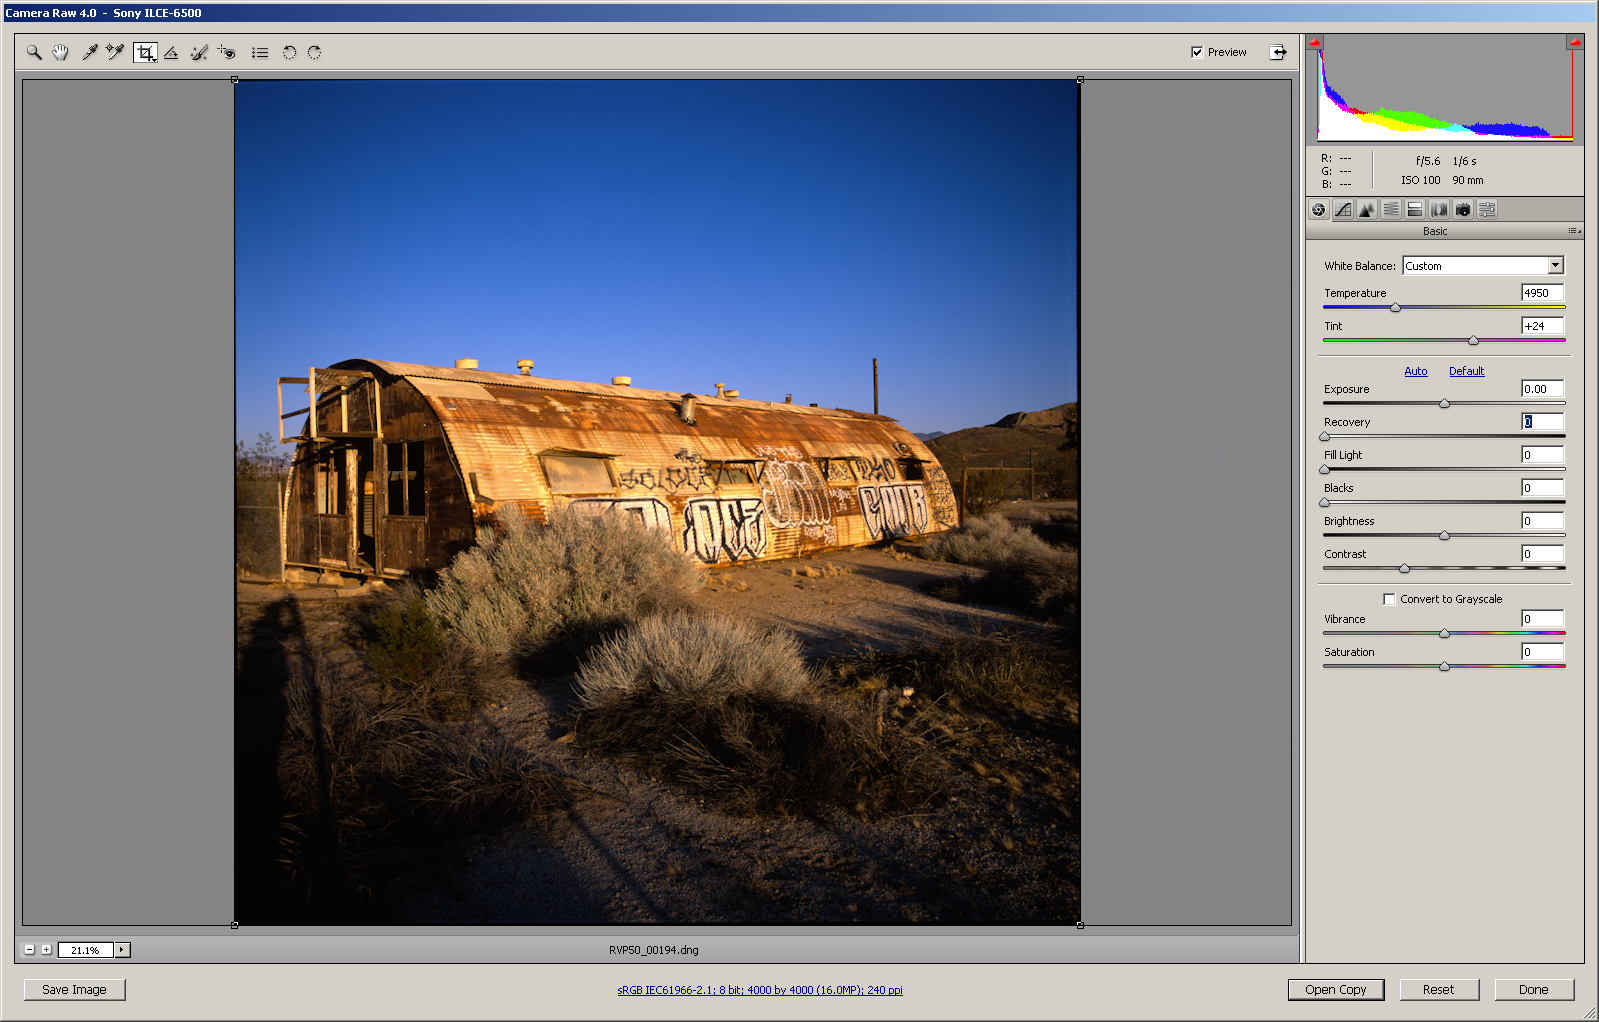
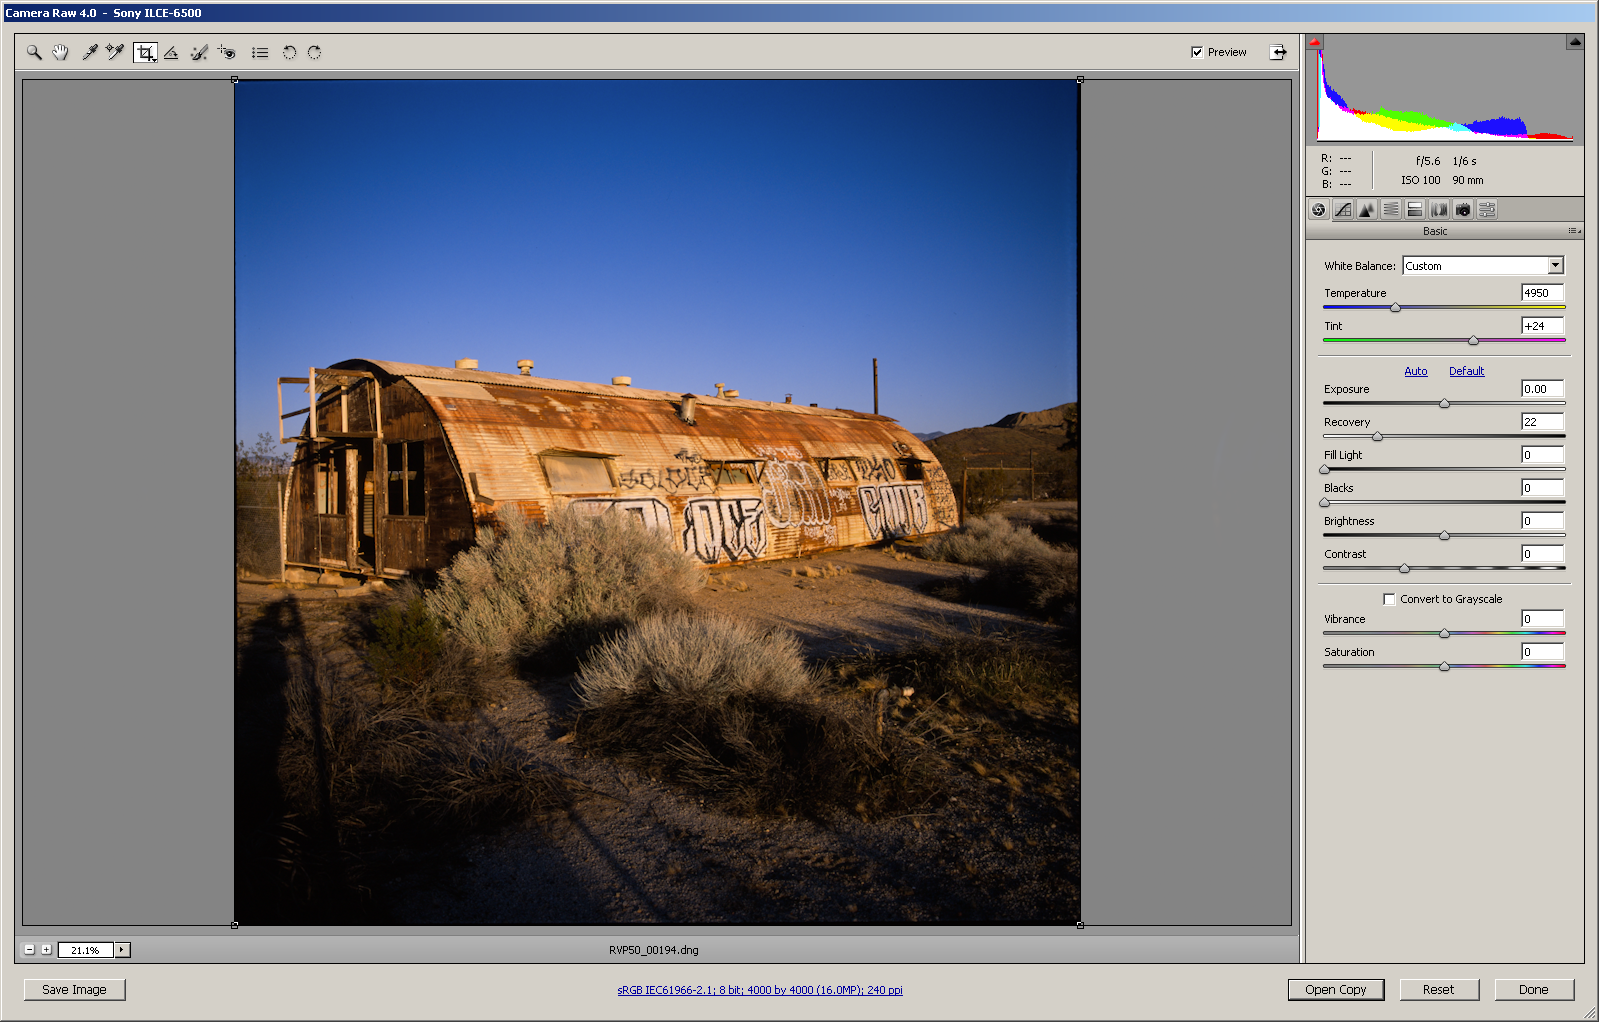
Tweaking
Really the only tweak I do in Camera Raw is the recovery slider. It will recover blown highlights that are overloading channels. Notice that the bright highlights on the hut are starting to turn glaring yellow and look like pizza cheese or something. There is also a colored triangle in the upper right of the histogram to let you know the highlights are overloaded.
Add a bit on the recovery slider to fix these highlights. Don’t use too much or your picture may end up looking dull and flat. If you find yourself adding too much, speed up the shutter speed on your camera to reduce the exposure and try the scan again, instead of trying to fix it in Camera Raw.
B&W negative
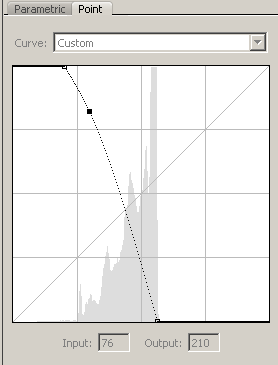
This guide has been for color slide film, which is probably the easiest to scan even though it has a reputation for being hard to shoot. For black and white negative the process is the same except you will need to reduce your exposure as B&W negative is much ‘thinner’. You can also do the inversion here by going to the curves tab. Flip the end points to the opposite side to invert it. You probably also want to add a curve to make things look more natural, here’s a sample of a curve I used.
This is also artistic choice so play around with it until you get something you like. Since negative film is much more forgiving of misexposure you’ll probably need to tweak the curve for each shot.
Color negative
I have shot very little color negative. You can scan it this way too, but you will need to do the color inversion yourself. Photoshop has some curves presets for this, but I found it pretty difficult. I know there are programs out there dedicated to the color negative inversion process. You might try them out but I have no advice there since I’ve never used them.
Lab scans
I used to have my film lab scan all my slides. They were fine, but I didn’t like the lack of control over how it looked (unless I took my film back to the lab for rescanning). If you decide to use lab scans with slide film, at least ask them to not do any color correction. If you’re shooting with filters they’ll probably color correct the filters right out!
It’s much more of a pain but I’ve found the advantages of home scanning to be:
Control over alignment. Instead of having to rotate in Photoshop (with the loss of sharpness), I can rotate the film physically in scanning and correct for any tilt.
Control over exposure. Any wrong exposure and I can make it look just like I want, instead of relying on what the lab tech thought was right.
Better colors. I’ve seen many lab scanners flatten the colors and really lose the subtleties.
Cheaper! Home scanning is free, and you probably already have a suitable camera. Of course you will have to decide for yourself if the time is worth it.
Comparison
So here’s a comparison between a lab scan and a home scan of the same slide.
Lab
Home scan
Your opinion may vary but while the lab scan has better resolution and is sharper, the home scan is properly aligned, has better shadow detail, better color, and doesn’t crop off the edges.
35mm home scan
All the previous scans have been for 120 medium format film, if you want to see what kind of resolution you can get, here’s a full unedited scan of 135 Fujifilm Provia 100F at 24 megapixels:
Happy scanning!
Optimizing NVMe performance with dm-crypt
I recently switched over from Windows 7 to Debian Linux on my main desktop, and along the way decided to set up full disk encryption with dm-crypt because it seemed like support was good, so why not? At the very least it would save me any worry if the drive dies and I had to throw it out. In general I would like to have ‘performance’ more than ‘paranoid’ settings when it comes to tweaks. I basically accepted Debian’s default options on the install and went for it. I also ended up doing dm-crypt-on-LVM for the flexibility of multiple partitions. The drive ended up looking like this:
The problem came when I started running IO-heavy workloads, generally loading large AI models from disk. These only ran at about 1000 MB/s, far short of the 7450 MB/s they promise on the box. I know Samsung probably lies on these benchmarks but not that bad. Unfortunately I can’t remember what I got when testing under Windows 7.
I turned on all the performance options in /etc/crypttab, so the line for the NVMe ends up looking like:
Note that the queue depth 8 sequential test actually comes pretty close to the advertised speed, but the Q=1 test is more like what I was seeing when running actual large loads from disk.
For comparison I ran a (256 MiB) test on the /boot partition, which is outside the dm-crypt volume:
The read speeds are mostly the same, except that important sequential Q=1 benchmark is over 3 times faster! I did a bit of looking around, CloudFlare had a good writeup on optimizing disk encryption speed, and I also found this useful Reddit post. It seems like the sector size dm-crypt is using is important. It may be using 512 bytes, even though the overlying file system (ext4 in this case) is using 4096 so we never use any less than that size. Let’s check what size nvme1n1p3_crypt is using:
We’re using a sector size of 512. It’s also using AES-256, in XTS mode (which is why the key is 2x the size).
I set up a test using my secondary NVMe. This is older and slower (Samsung 980 Pro vs the 990), as well as in the 2nd M.2 slot which means it’s sharing 4 PCIe lanes with the network interfaces, SATA devices, etc. instead of its own dedicated 4 lanes to the CPU.
I formatted this guy up, using the above options, but AES-128 to see if there was any appreciable difference. This is the sequence of commands. Note I’m reading the password from a file (which itself is on the encrypted /home drive).
A little faster, maybe from the smaller key size, but largely the same as above. Let’s try reformatting it with a block size of 4096 using the --sector-size=4096 option when calling cryptsetup luksFormat. Results:
Nearly a 2x speed-up versus the original case! Obviously this is the way to go. For experimentation I tried a sector size of 4096, but with AES-256 to see how much of an effect that has:
A little slower, but still faster with the larger sector size.
So, let’s change the key size and sector size. Thanks to the wonderful cryptsetup, we can actually do this online, on the boot drive, while using it! It even tolerates interruptions (not that I wanted to test this, it’s scary…). The command we want:
# cryptsetup reencrypt --key-size=256 --sector-size=4096 /dev/nvme0n1p3
Enter passphrase for key slot 0:
Auto-detected active dm device 'nvme1n1p3_crypt' for data device /dev/nvme0n1p3.
Finished, time 51m22s, 1862 GiB written, speed 618.6 MiB/s
Alright so not quite double, but an improvement all around, for free! Write performance was also greatly increased. Still short of the unencrypted performance, but still pretty quick. The Q=8 test is actually almost the 8 GiB/s speed of the PCIe 4.0 x4 link, so I call that pretty good.
In summary, if you’re using NVMe drives with dm-crypt, for max performance I would:
Make sure your dm-crypt is using a sector size of 4096 (or your sector size if using something different)
Use a key size of 256 (AES-128 with XTS)
Enable TRIM through the dm-crypt volume with the --allow-discards flag to cryptsetup or discard in /etc/crypttab
Disable workqueues with --perf-no_read_workqueue, --perf-no_write_workqueue flags or
no-read-workqueue,no-write-workqueue options. YMMV with this though so test both (cryptsetup refresh can change it online)
The security implications of the above are left as an exercise for the reader, but personally I’m OK with it.
Oh well it was fun well it lasted, F for my tweeter 2013-2021, another casualty of the ‘rona.
If you are here because you clicked on the link in my profile, you can view the waifu site at chihaya.moe.
Dead site and revival
It’s been over a year since my last post. I suppose it’s sort of neglect, but I’ve not had much that I feel like writing up in a blog post. I am quite active on my Twitter and Twitch stream, so you could follow those.
I’m thinking about revamping the site though and sort of transitioning formats. I have a lot I’d like to write up in a sort of static article/write-up format that wouldn’t fit well in a blog post. It’s going to take a little bit of rework of the code to get it done though. I think I’ll also remove the comment functionality, since it’s been virtually unused (only 2 comments in over 4 years).
Even more cartoon books
Wow more manga opinions nobody cares about.
I finished reading K-On! (けいおん!), K-On! College (けいおん! college), and K-On! Highschool (けいおん! highschool). It’s a fun light-hearted series that I really should have read earlier. The premise is simple, a bunch of high schools girls form a music club and get up to the usual anime antics. Anyway you’ve probably heard of it, and it’s popular for a good reason so go read it!
This month a pre-order I placed months ago for a figurine arrived, along with a couple of others I ordered at the same time. There’s some pictures on my Twitter if you care to see them. Worth it I guess, I’ve got the money. I was surprised nobody I knew passed judgement for gay-ass anime girl figurines.
There’s another couple of currently-publishing mangas I’m reading:
My Senpai is Annoying (先輩がうざい後輩の話) is a cute little heart-warming series that’s being published on Pixiv. It’s one of those tsundere almost-romance stories.
I watched Pop Team Epic (ポプテピピック) as it was airing. If you can’t appreciate some really avant-garde surrealist humor you might not like it. I thought it was pretty good. A lot of crazy meta-jokes. When I first heard about it (through physical advertisements in Akihabara!), I’ll admit I had no clue how they were going to make it into an anime. But they did somehow and it turned out pretty decent. They gave these guys 24 minutes to make whatever they wanted, and it turns out it’s 12 minutes of whatever they wanted but twice. Go give it a shot, you might like it.
Apart from that I’ve just been up to the usual stuff: work and counterstrike. Follow my Twitch channel if you like to watch people play video games instead of playing them yourself. I’ve also got a vacation planned in a couple of weeks to Las Vegas/Grand Canyon/the Southwest, so maybe that will be fun.
More cartoon book reviews
I wanted to write an update on the stuff I’ve been reading so…
I finished reading the main series of Nichijou (日常). It’s a great light-hearted comedy manga, but if you can’t appreciate the absurdist kind of humor it features you might not like it, it took me a bit to get into it. If you’re looking for something fun to read I’d totally recommend it. I was something I enjoyed reading during those isolated evenings down in the Mojave desert. The manga almost seems like it was written to be made into an anime with how animated it is. I haven’t watched it though, maybe sometime soon. Helvetica Standard (ヘルベチカスタンダード) is like the DVD bonus features for the manga, I picked it up and you should too if you liked it.
I finished all six volumes of Mysterious Girlfriend X (謎の彼女X ‘Nazo no Kanojo X’) as well. It’s a bit of a longer read but if you wanted to read a romance manga I’d absolutely recommend it. Unlike some others I’ve read I liked how it set the story up for drama but instead of things turning bad everything resolves in a nice wholesome manner, it was almost refreshing. The story was kind of slow and doesn’t make a lot of progression so if you wanted a riveting story that keeps you going for the next volume you might not like it. On the other hand, if you want a sweet, loving, fun story to read you’ll like it as much as I did. There’s an anime too but I haven’t seen it. Considering how many volumes of manga there were I would imagine they cut out quite a bit.
I’m up to volume 4 of Aho Girl (アホガール). I’ll admit I’m only reading it because of the memes. If you want a fun 4-koma comedy manga it’s pretty good.
K-On! (けいおん!) is another series I started reading. It’s a nice fun little manga with cure girls doing cute things. It’s only four thin volumes so it’s not terribly long.
I also picked up a bunch of doujins at Comiket 93 when I was in Japan over Christmas. It was super cool but I don’t really have any reviews to write.
HTTPS
I got HTTPS working on all my website thanks to Let’s Encrypt! Props to them for being free and painless (except trying to figure how to get this to work with vhosts, that’s my fault).